Artisan Prestige Traced in Hand-Crafted Wagasa
〜A Comprehensive Guide to Japanese Wagasa Umbrellas〜
Traditional Japanese umbrellas (wagasa) are craftworks deeply rooted in everyday life, made using natural materials such as washi paper and bamboo through time-honored techniques. Each production region has its own distinct character: Gifu is known for its delicate designs with a playful touch, Kyoto for its understated beauty that embodies wabi-sabi, and Tottori and Toyama for their sturdy construction designed to withstand heavy snow.
Wagasa are a companion in Japanese everyday life. Keep scrolling below as we push open the veil of wagasa and their role in daily life across Japan’s history, plus a glance at an esteemed wagasa shop that hosts hands-on mini wagasa workshops to this day.
Where it Starts
Wagasa are Japanese umbrellas and a celebrated heritage of Japanese craftsmanship you can trace through the ages. Spindled through thousands of years to present day, wagasa still serve as an integral part in local daily life. You can spot them easily by their completely natural materials, including shades made from Japanese paper instead of cloth and bamboo spokes. This natural construction is a nod to the tradition of making wagasa from the everyday items that Japanese people had around them. Free of big industry and standardized swatches, each piece carries the unique mark of the natural ingredients used to make it, and the meticulous work of a Japanese craftsperson who understands this traditional craft.
There are four major regions still making wagasa today: Gifu, Kyoto, Tottori and Toyama Prefectures. Gifu wagasa are marked by noticeably playful, whimsical touches, made with elaborate designs and slimline frames that boast a slender shape when closed. In Kyoto, the customs of “wabi-sabi” and their historical pairing in tea ceremony inform a more straightforward design. Alternatively, Toyama and Tottori are the snow-dredged regions across Japan Sea that call for a sturdier design that can withstand the water weight of rain and snow.
Wagasa are a companion in Japanese everyday life. Keep scrolling below as we push open the veil of wagasa and their role in daily life across Japan’s history, plus a glance at an esteemed wagasa shop that hosts hands-on mini wagasa workshops to this day.
What is a Wagasa Umbrella
The History Behind Wagasa
The history of umbrellas opens with an inexact start, set roughly to an origin some 4,000 years ago, as depicted in murals from Ancient Egypt, Greece and Persia. A mural dating around 1300 BCE in Egypt shows the visage of an umbrella fashioned from palm tree leaves. As the mural indicates, umbrellas of that era were not like those we have today. Instead, they were fashioned more like canopies made by stretching cloth or leaves over a wooden pole. They were also symbols of authority and could only be used by those in power, such as kings and nobles. On a deeper level, umbrellas have been long said to first carry a religious meaning, believed to “protect people from evil descending from the sky.”
In Japan, there are few to no mentions of umbrellas, making their exact origin story hard to try. However, according to the oldest written record, the Nihon Shoki (compiled in 720), tales have it that in the year 552, King Seong of Baekje presented Emperor Kinmei of Japan (Kofun period, 509-571) with Buddhist statues, ritual implements, scriptures, and an item called kino-gasa-the type of umbrella used at that time. There are also depictions of umbrellas found in ancient tombs and on furnishings.
Picture scrolls from across the Heian period (794-1185) feature imagery of wagasa, but with a different shape from today’s design that could not be opened and closed. These earlier wagasa were kept in a permanently open position. It was not until the Azuchi-Momoyama period (1568-1600) that wagasa were made so they could be folded. They only began to be used by common people from the mid-Edo period onward.
One theory about why they became fashionable attributes it to kabuki actors. Wagasa were incorporated into kabuki, traditional Japanese dance, the tea ceremony, and other cultural arts, making them inseparable from traditional Japanese culture. The sight of kabuki actors striking dramatic poses on stage while holding wagasa looked stylish, inspiring ordinary townspeople to want to use them as well.
Many ukiyo-e prints from the Edo period depict townspeople holding umbrellas, showing that they had spread as essential items of daily life. Not only were they used in everyday situations, but wagasa also evolved into fashion accessories. This led to a wave of styles that favored utility and beauty in the same design.
Over 10 million wagasa per year was the peak level of production in their heyday before import of the western umbrella launched alongside the Westernization trend of the Meiji Era (1868-1912). Wagasa have seen a steady and rapid decline, now with just some 20 shops in all Japan that still make them. However, wagasa are still long forgotten as they take up the cultural helm in featured spots in Kabuki, Japanese dance, team ceremony, temples and shrines.
Wagasa by Type
Bangasa Umbrellas
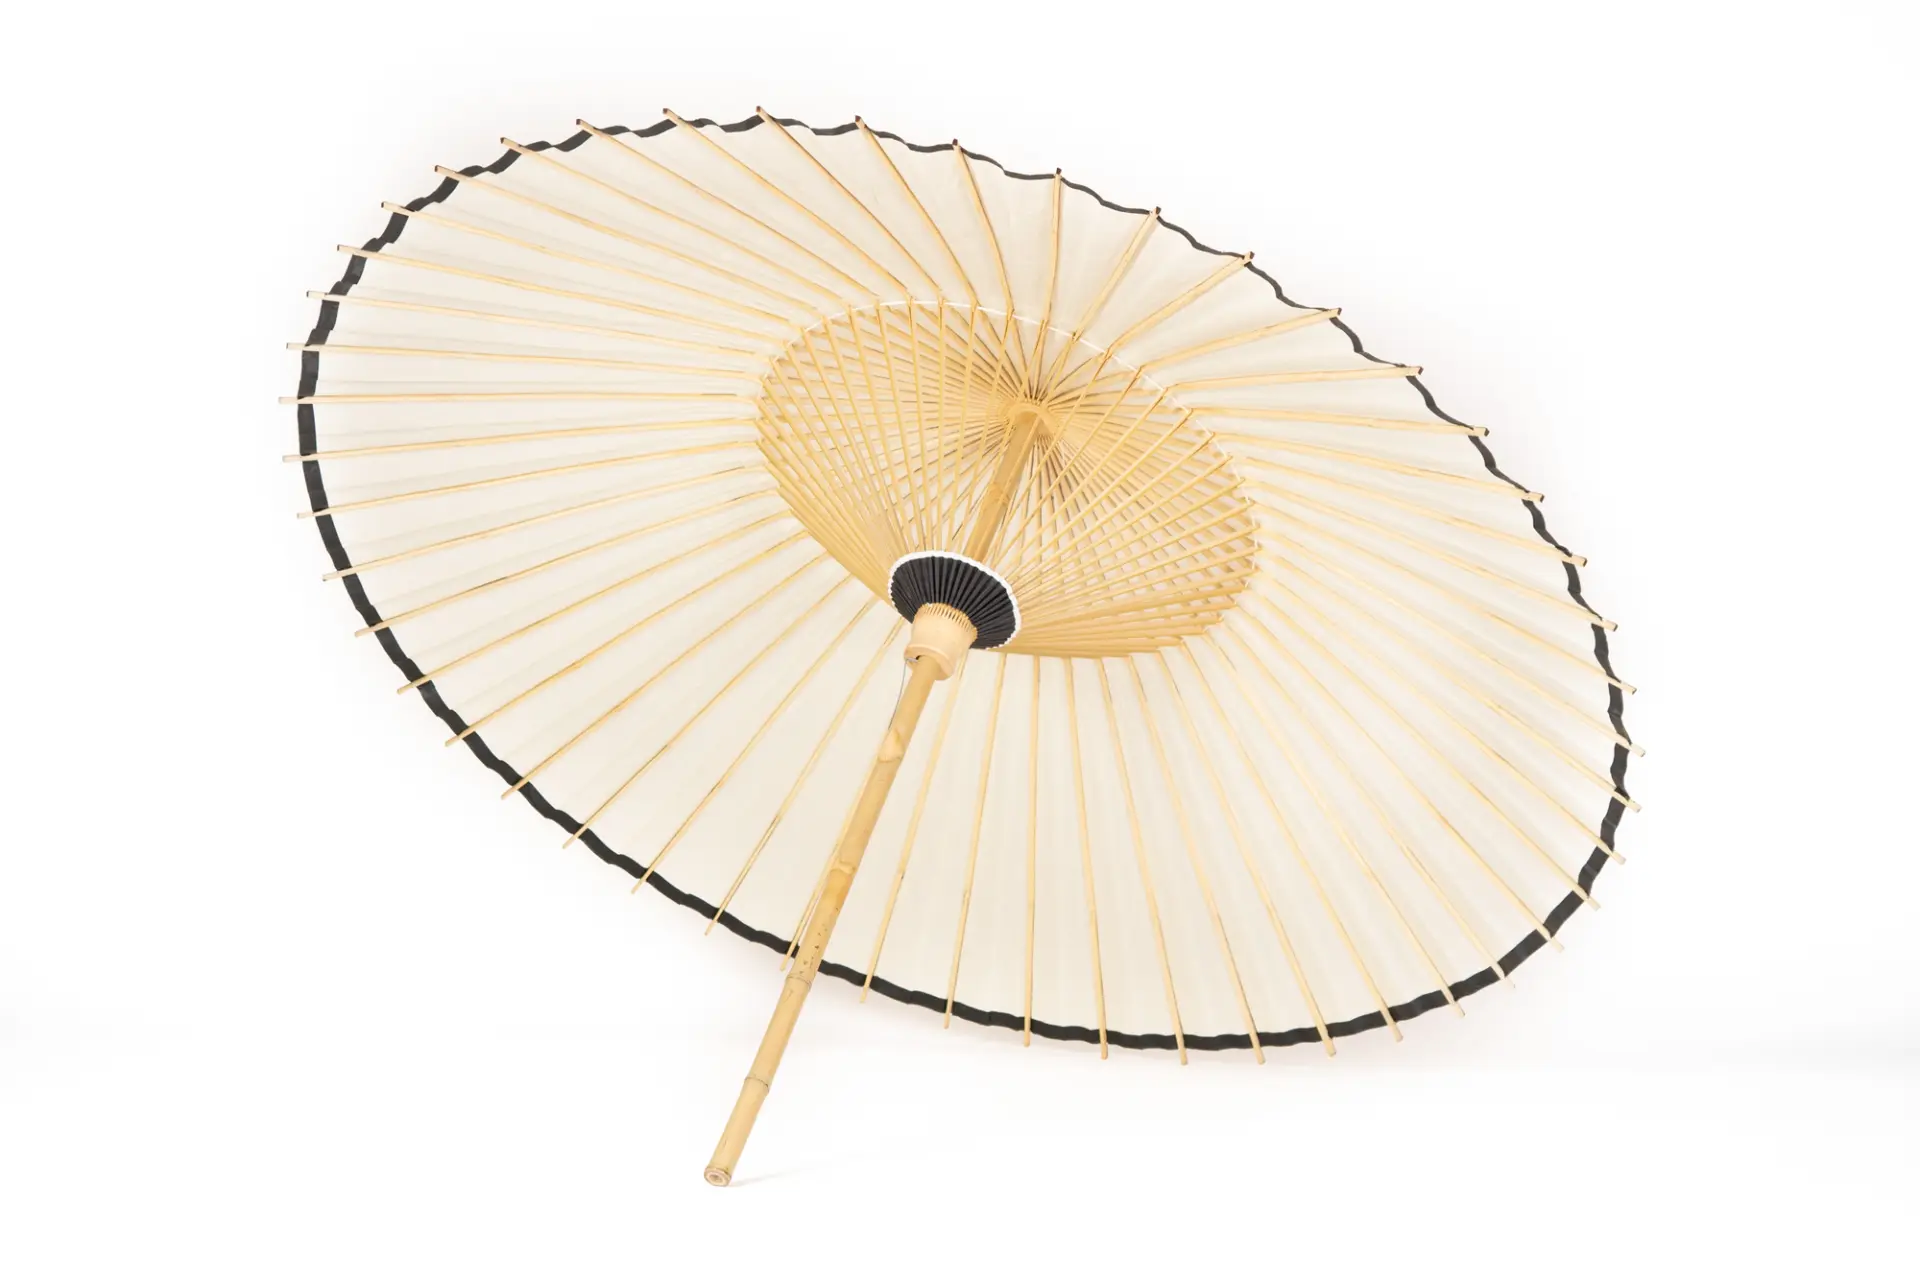
This sturdier variety of umbrella stands out for its thicker spokes and sole use of thick white paper. The standard size is 1m 10cm or more an diameter, complete with 48 total spokes. The word “ban” in the name points to a sense of everyday, offering everyday utility whether rain r shine. Many merchants in the Edo period adopted this style and launched the trendy nickname of “tonyakasa” umbrellas.

Janome Umbrellas
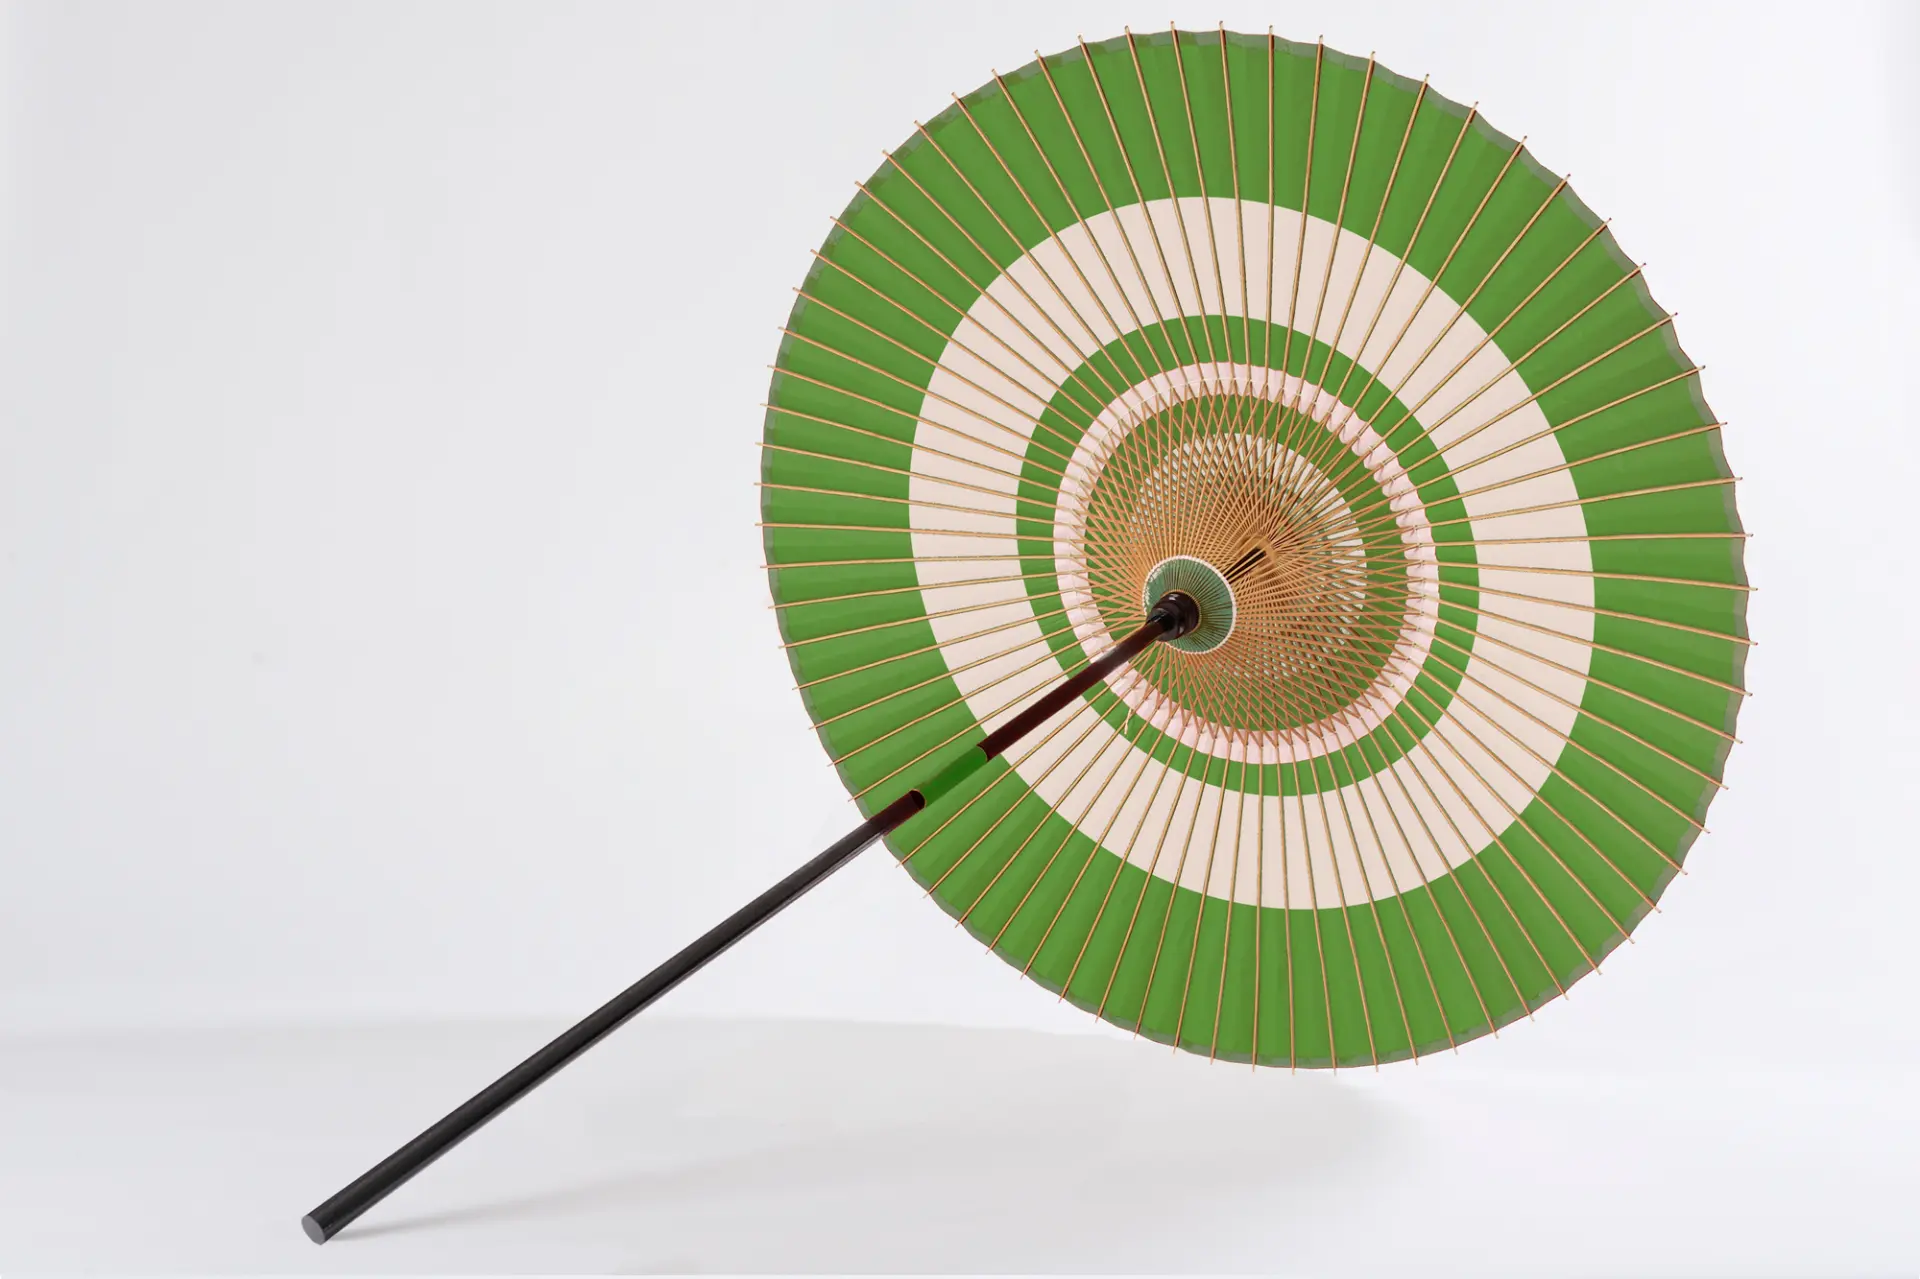
Considered a more elevated upgraded to the bangasa, the Janomegasa umbrella is a sturdy item made to withstand the rain, easily spotted by its large ring design. The standard look measures in at 1meter 10cm diameter or larger with a total of 44 spokes. Literally meaning “snake eye”, the Janome name is pulled from the striking ring design on top. The underside of the frame features a number of ornamental ties on the smaller spokes (called “ito-kagari”) that make each piece even more delicately charmed. While many umbrellas are original said to help ward off evil, the Janome variety was designed specifically as a “keeper of good fortune”, said to protect the special someone you gift it to. One trivia fact to know that even without that striking ring design, rain umbrellas with tied ornaments on the underside are commonly nicknamed Janomegasa now.

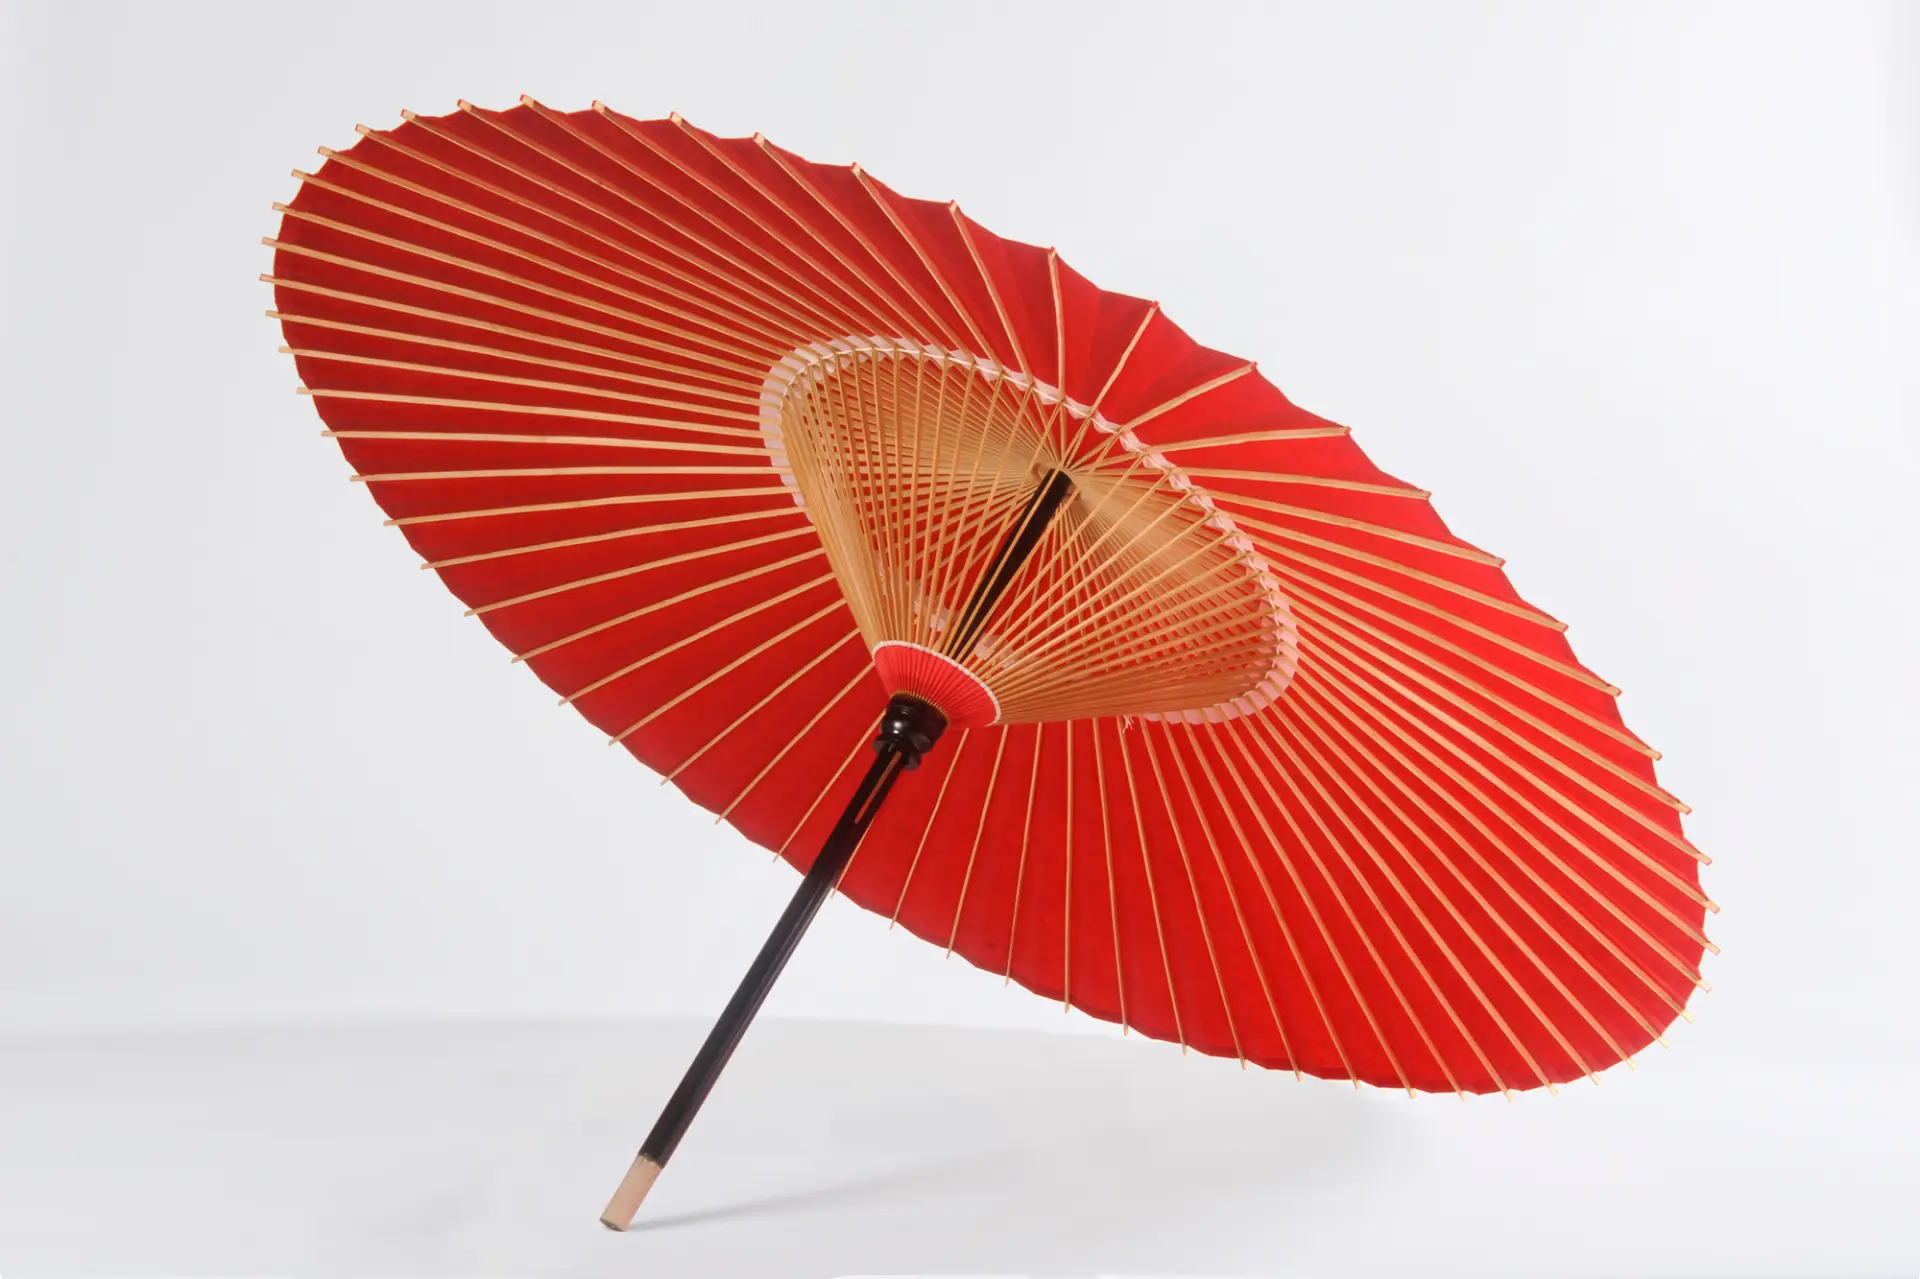
Sashikake Umbrellas
This larger variety measures in above the bangasa and janomegasa varieties with a diameter of 1m 30cm or larger. This particular wagasa was made to shade the royals and nobles. Today, you can find Sashikake Umbrellas used at shrines and temples, or for new couples on their wedding day.
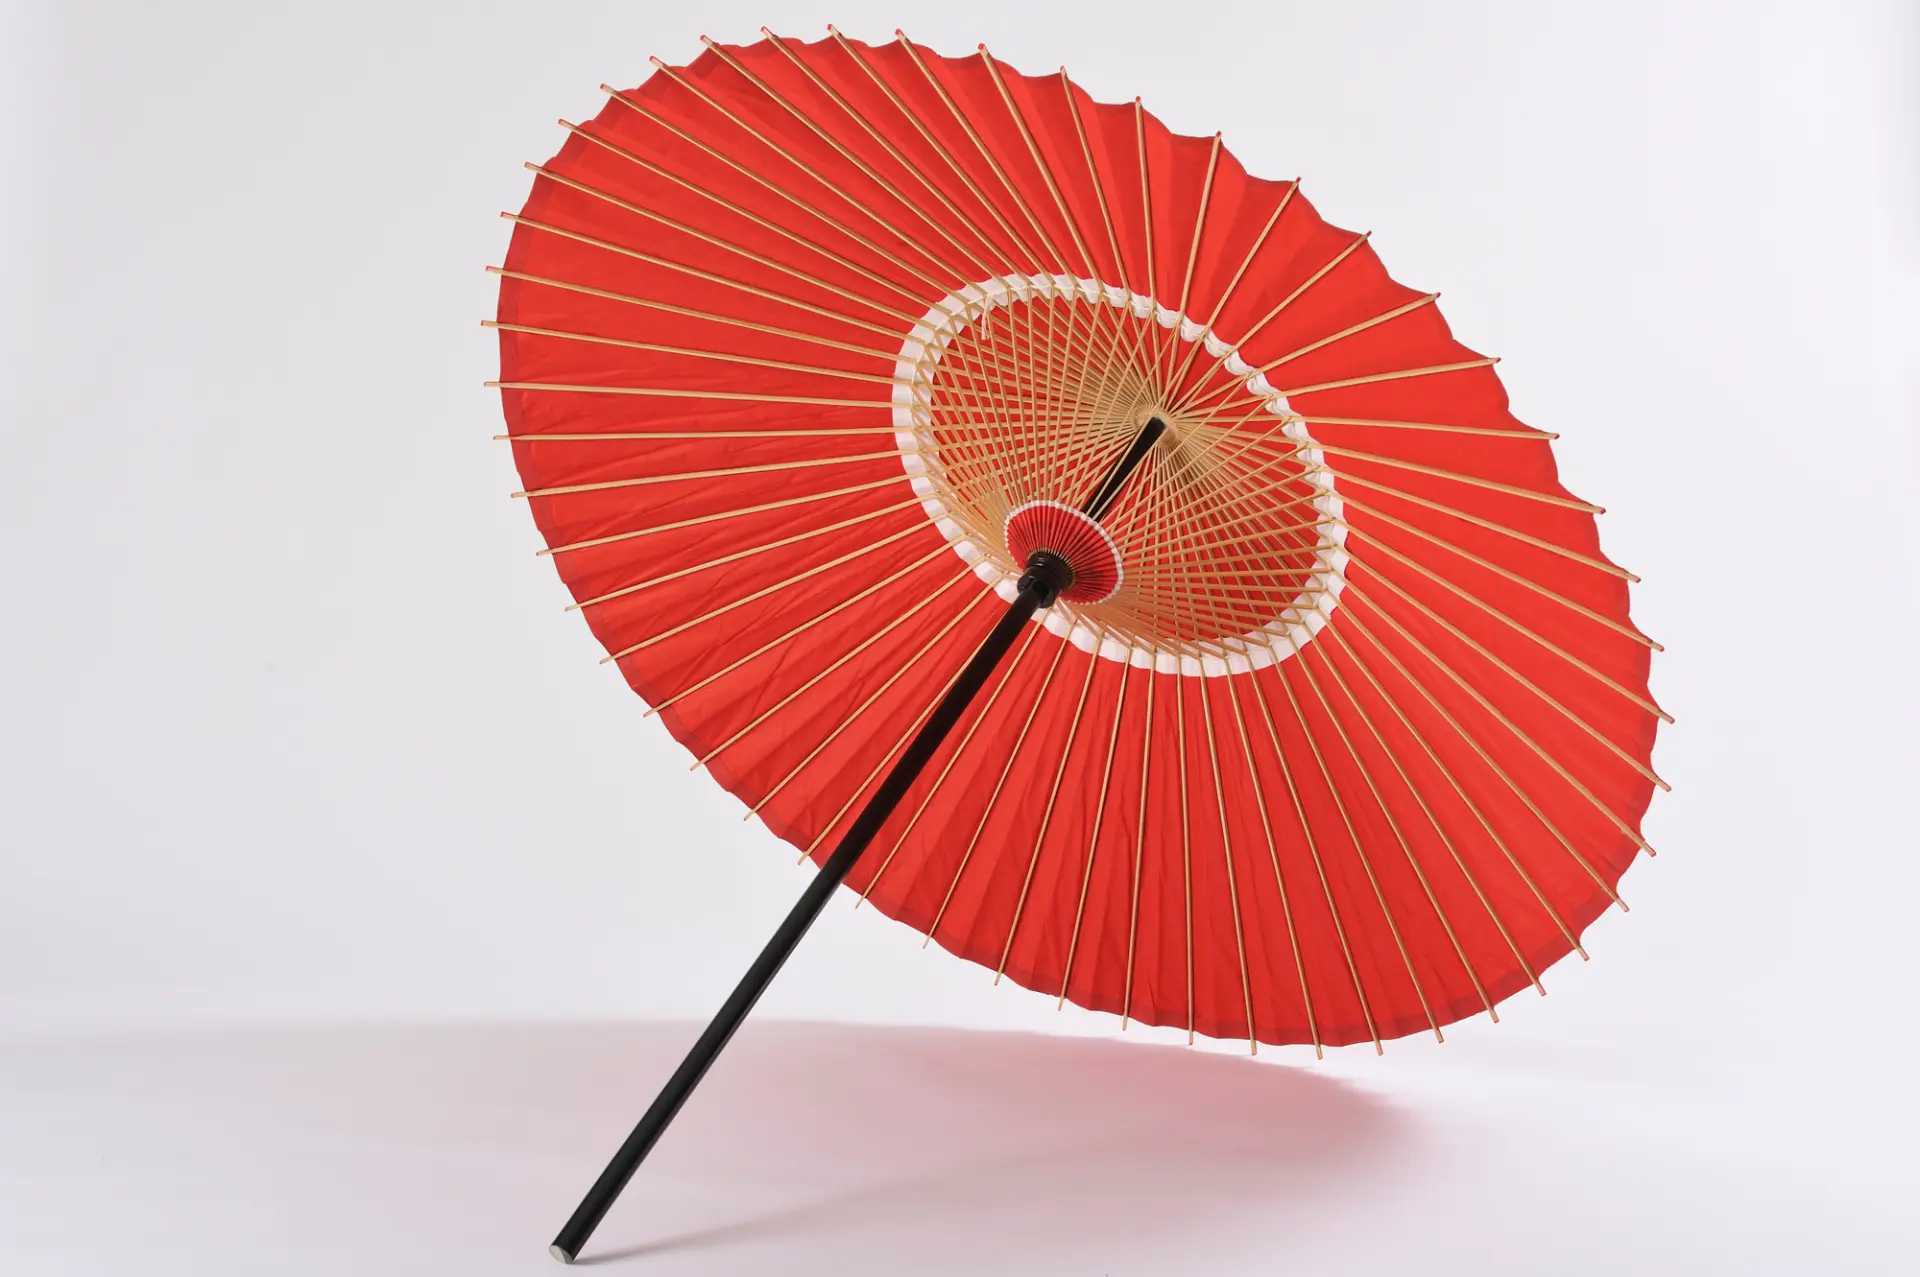

Tsumaore Nodate Umbrella
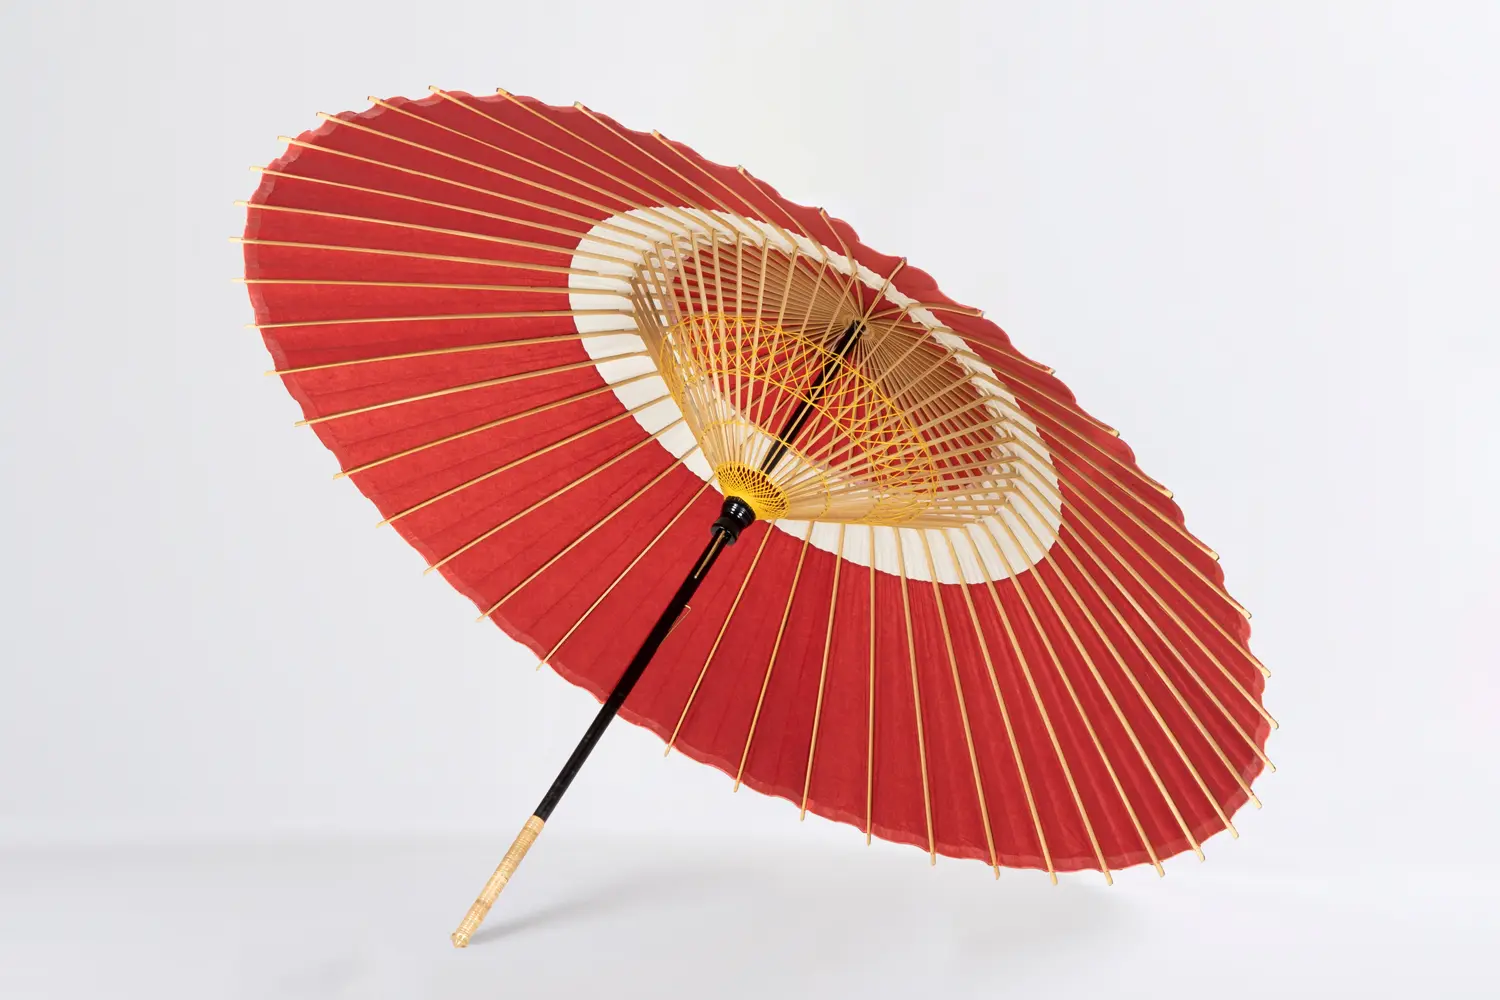
Spot the Tsumaore Nodategasa umbrella by its gently curved edge design. You can also tell this variety apart by the extensive use of decorative threads on the inner spokes. Of all the Nodate umbrella types, this is the most widely used variety today, used often in shrines, temples, festivals and ceremonies, or as interior accents at Japanese-style shops.
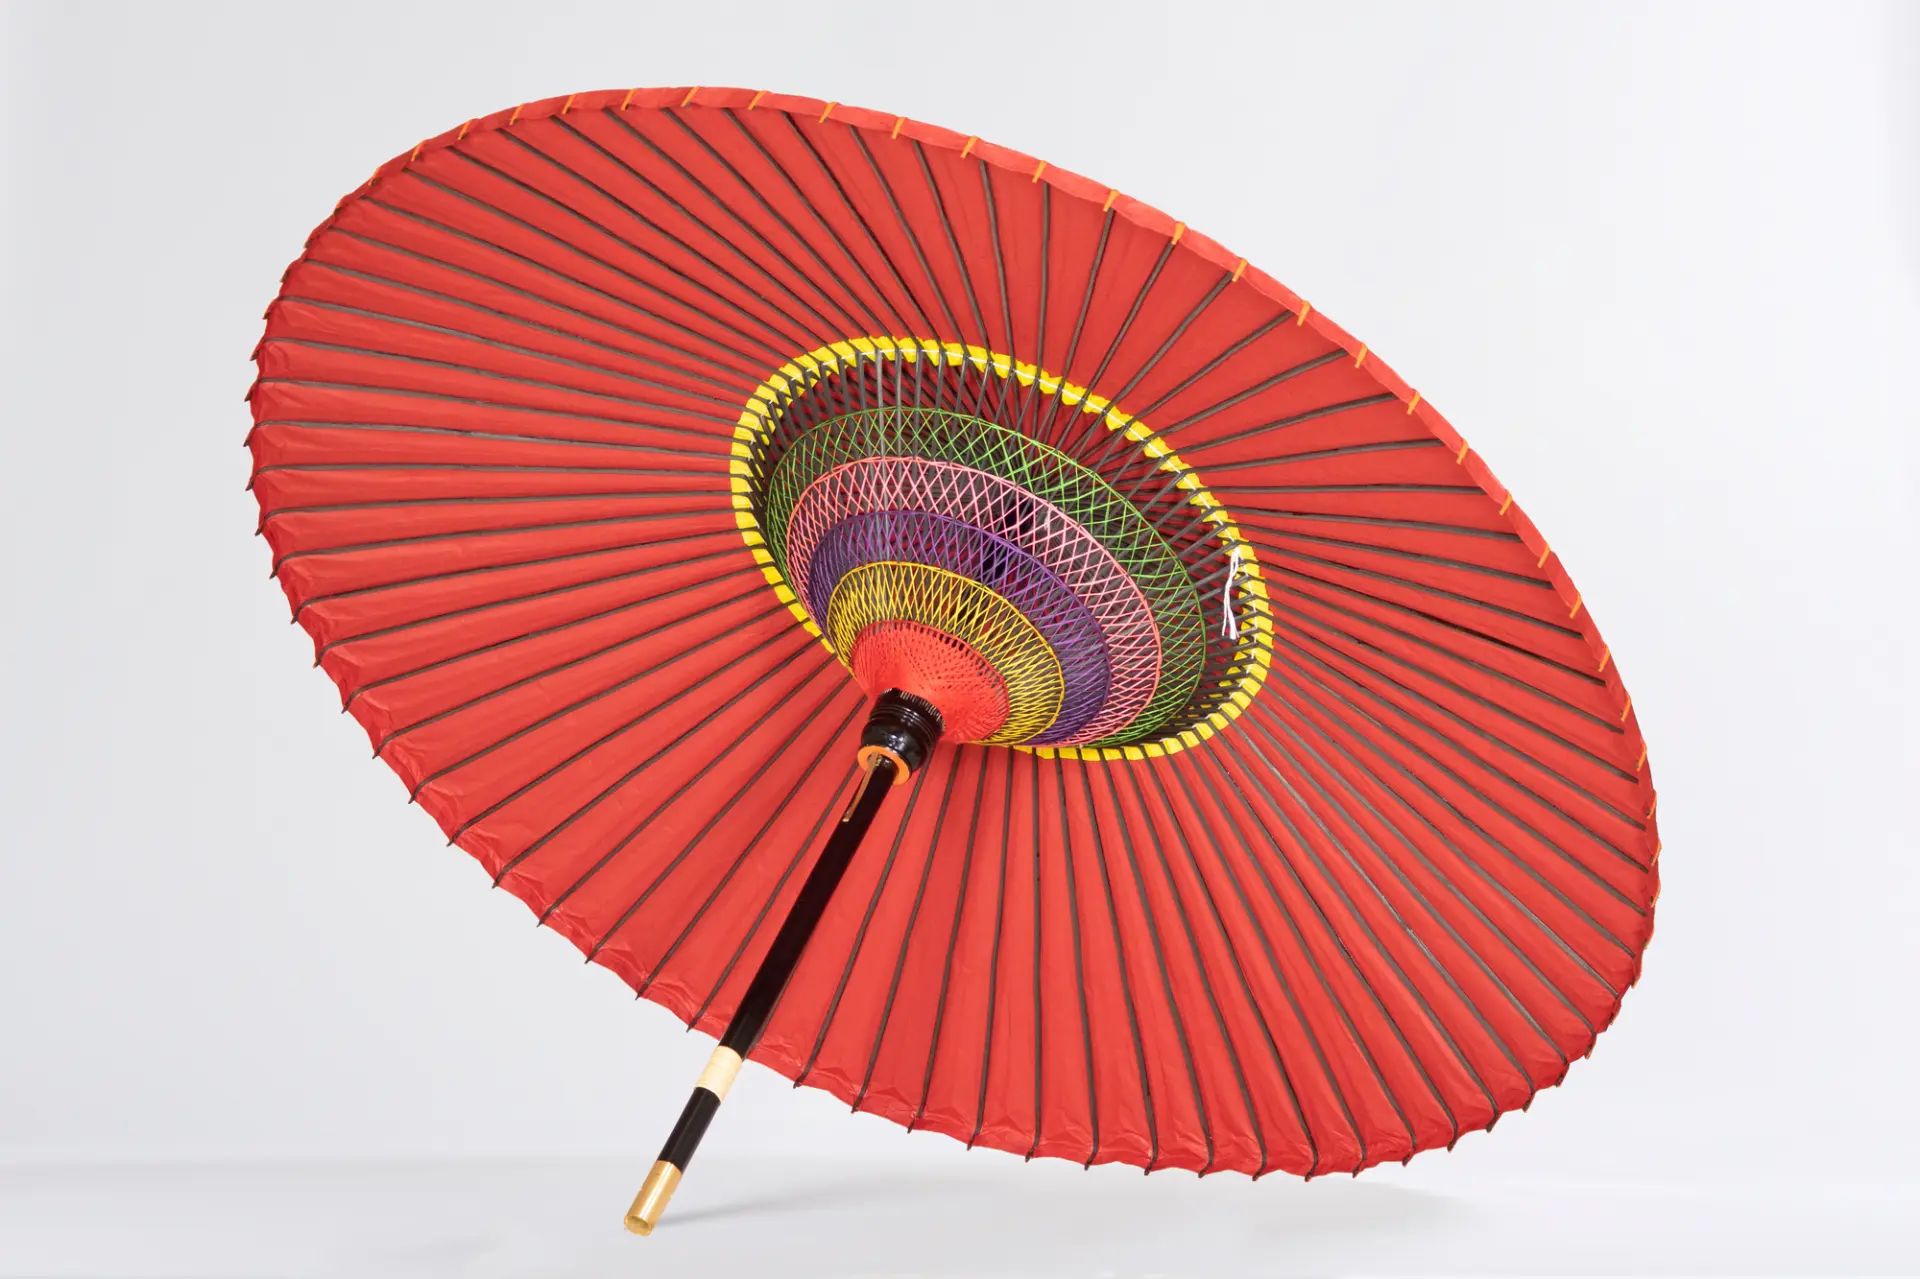

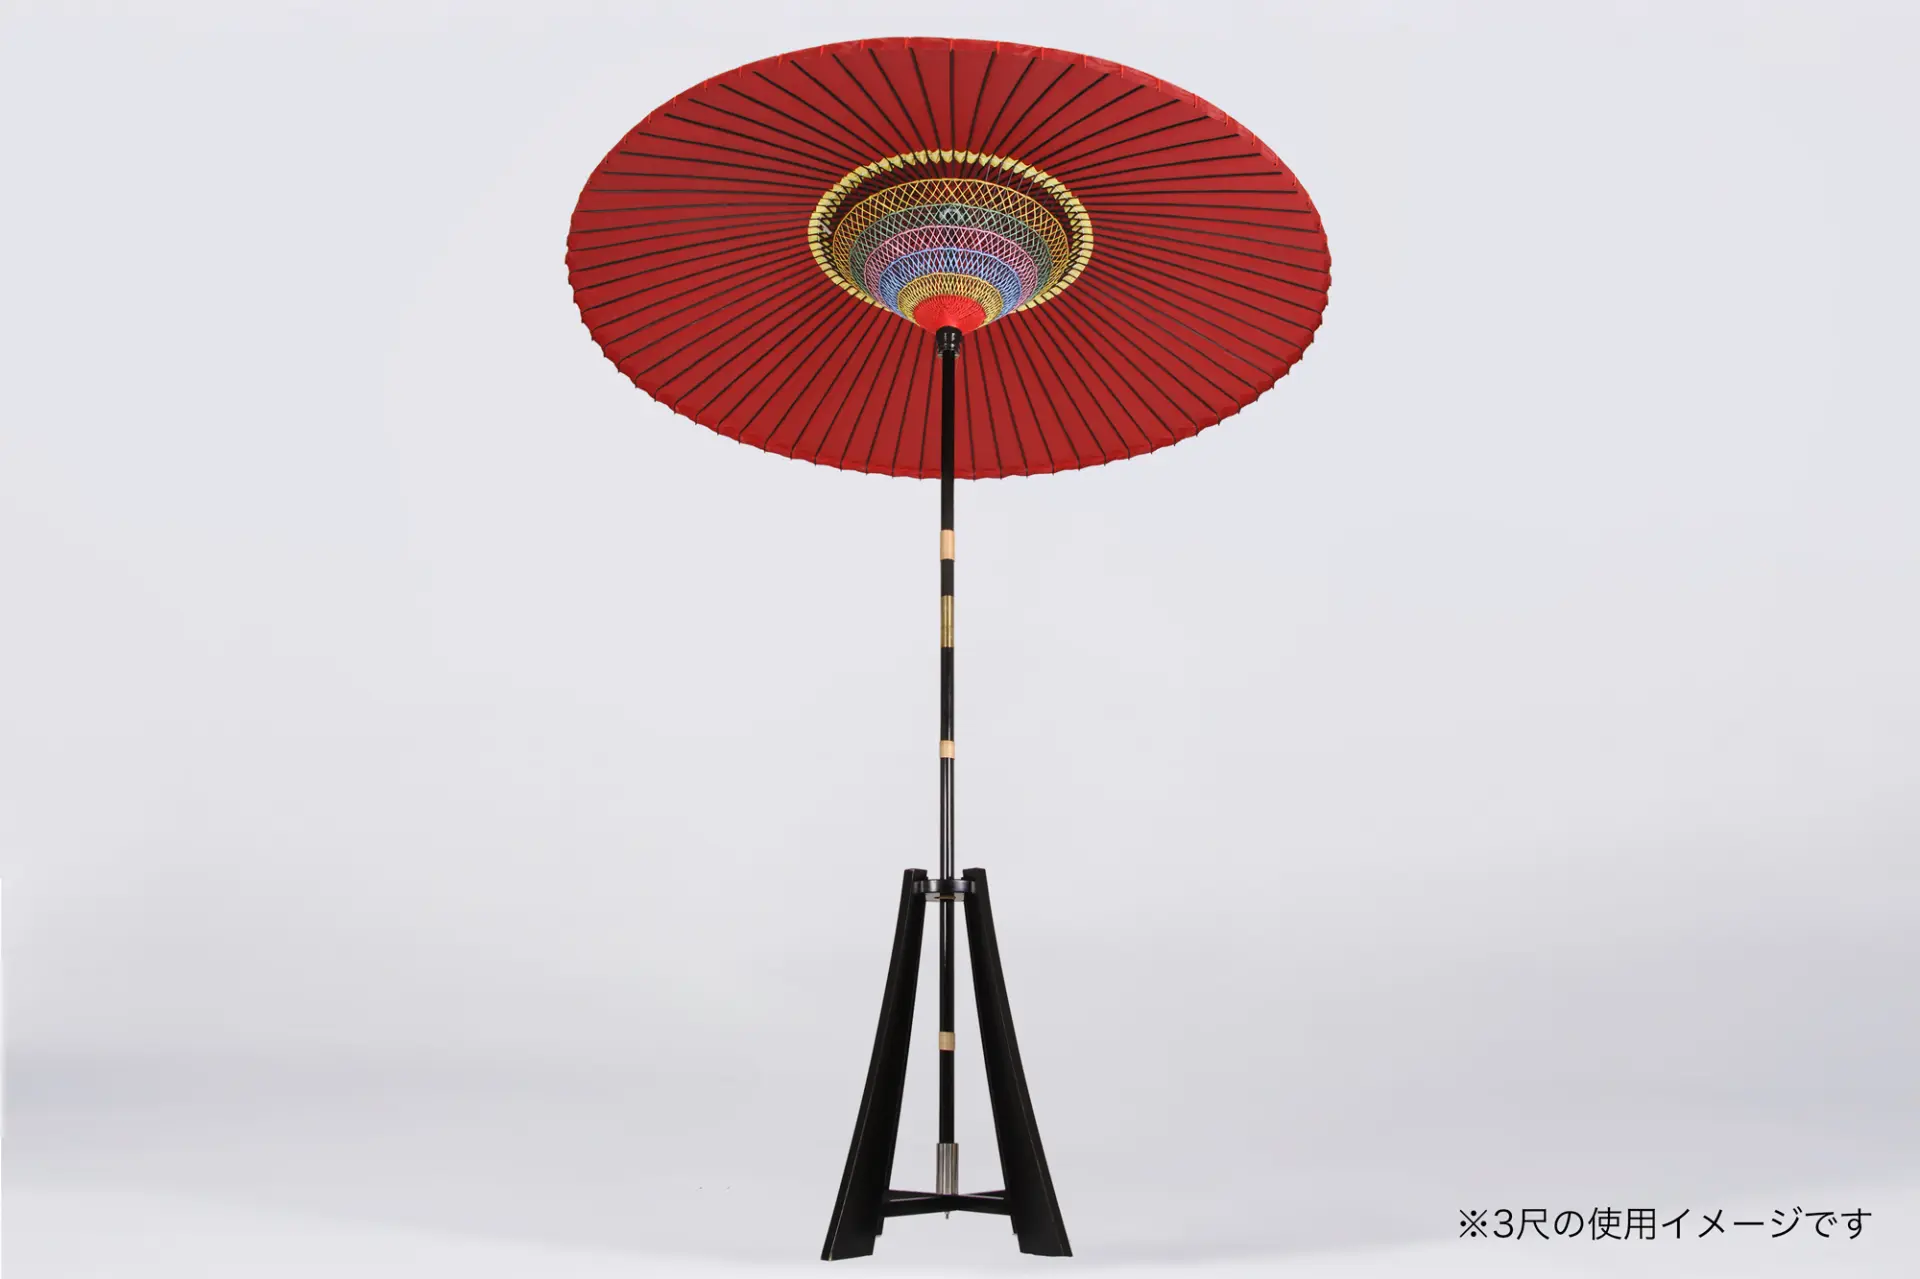
Honshiki Nodate Umbrellas
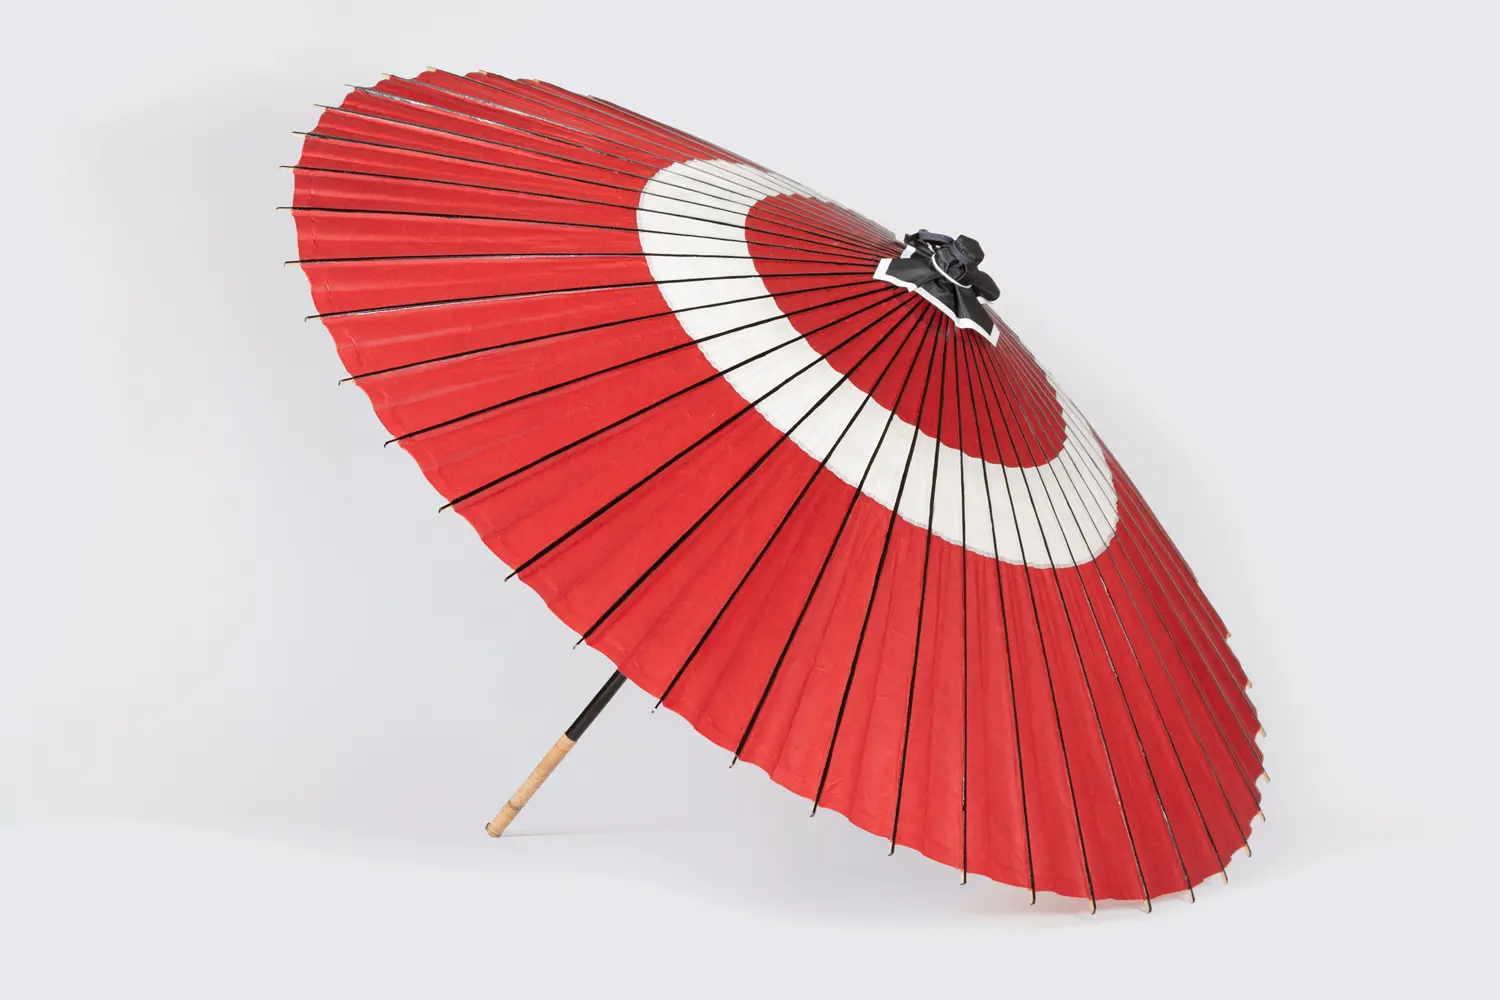
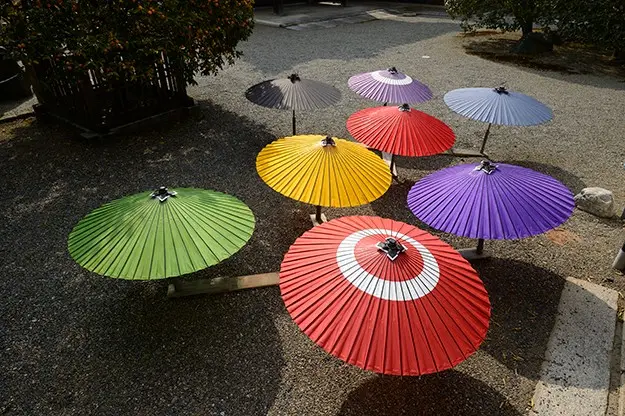
The Honshiki Nodategasa is a specific type within the Kyoto exclusive variety of Kyo-wagasa umbrellas. Comparatively large in size, the standard diameter measures around 1m 50cm or more. Their distinguishing features are their refined colors and their simple, beautiful silhouette, developed over many years in pursuit of the wabi-sabi aesthetic sought by the masters of the tea ceremony. Another notable characteristic of the formal nodate-gasa is its two-tone construction, such as red-and-white or green-and-white, which makes it suitable for highly formal occasions.


Other well known wagasa types include the Higasa, a parasol used for dance or on sunny days, or the buyogasa used notably in kabuki or Japanese folk dance.
Wagasa vs. Western Umbrellas at a Glance
While both named umbrellas, the Japanese variants keep a number of eclectic style elements that set them apart. Below is an overview in detail.
| - | Wagasa | Western Umbrellas |
|---|---|---|
| Materials | Washi paper, bamboo, wood & other natural materials | Plastic, polyester, steel, & other manmade materials |
| No. of Spokes | 3As many as 30-70 spokes depending on the specific variety. | Approx. 8 spokes |
| Opening | A lattice of intricate bamboo spokes push open a washi paper shade | Metal spokes pull the material down from inside in order to open. |
| Silhouette | General flat circular shape that opens forward. | Bends into a deep rounded arch. |
| Umbrella Closure | Folds inwards into a single column. | Wraps outside around the spokes to close. |
As detailed in the above chart, there are number of notable differences between the two worlds of umbrellas. The most noticeable is the way the material is folded, which comes from whether the shade is made of washi paper or cloth. The shade of wagasa umbrellas are made of an incredibly fine washi paper, meaning the only way to fold it down without tear or damage is with the paper folding inwards.
Western umbrellas, on the other hand, are made from materials such as nylon, which are relatively durable. This allows for a closure that wraps around the outer spokes with ease. Another reason wagasa have so many bamboo ribs is that washi has little elasticity and is relatively heavy, so it needs numerous ribs for adequate support.
How Wagasa are Made
Wagasa are made entirely from natural materials such as washi paper, bamboo, wood, linseed oil, lacquer, persimmon tannin, and tapioca starch. Specialized craftsmen are responsible for the bamboo ribs, the washi paper, and the umbrella assembly itself, and it takes anywhere from several weeks to several months to complete a single umbrella. If broken down into detailed steps, the production process involves dozens of stages, requiring extremely complex and highly specialized skills.
The ribs of a wagasa are made from a single piece of bamboo. The bamboo is split lengthwise into thin strips to create the spokes which are then arranged back into their original order. While the resulting lattice may look straight, it actually keeps a natural curve whereby arranging them in their original sequence ensures that this curvature is aligned uniformly. If the order is changed, gaps will appear between the spokess when the umbrella is closed.
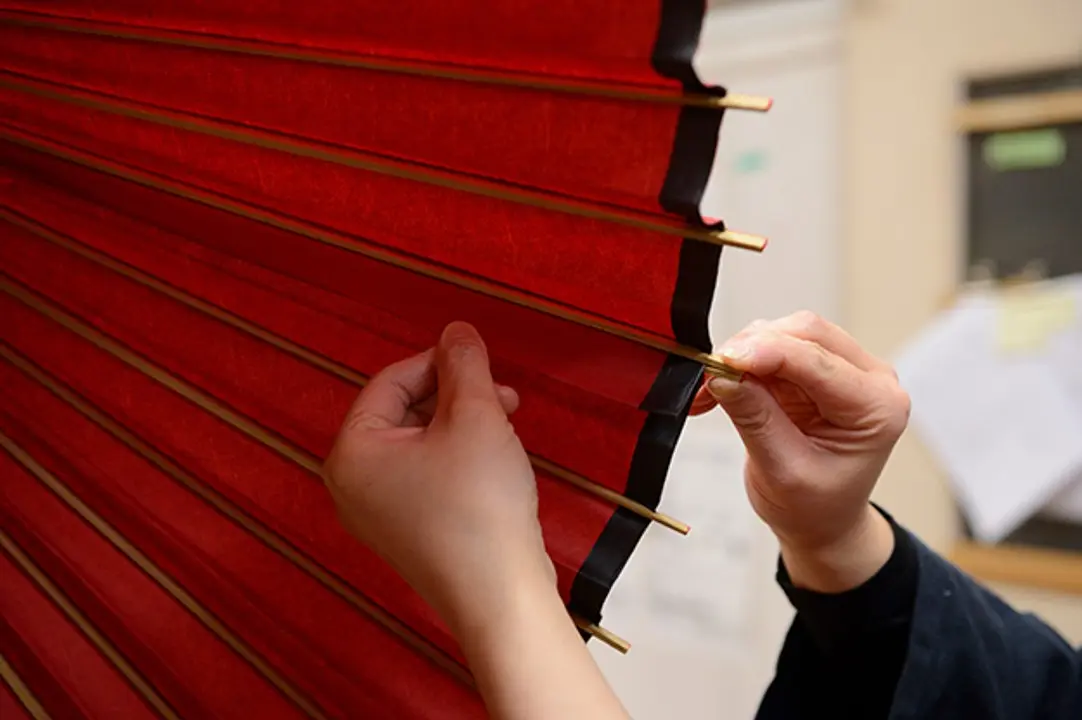
①Step One: Shitago
This is the stage where the materials are assembled. Each bamboo spoke is attached one by one to the rokuro-the top part of the umbrella-using a needle and thread.
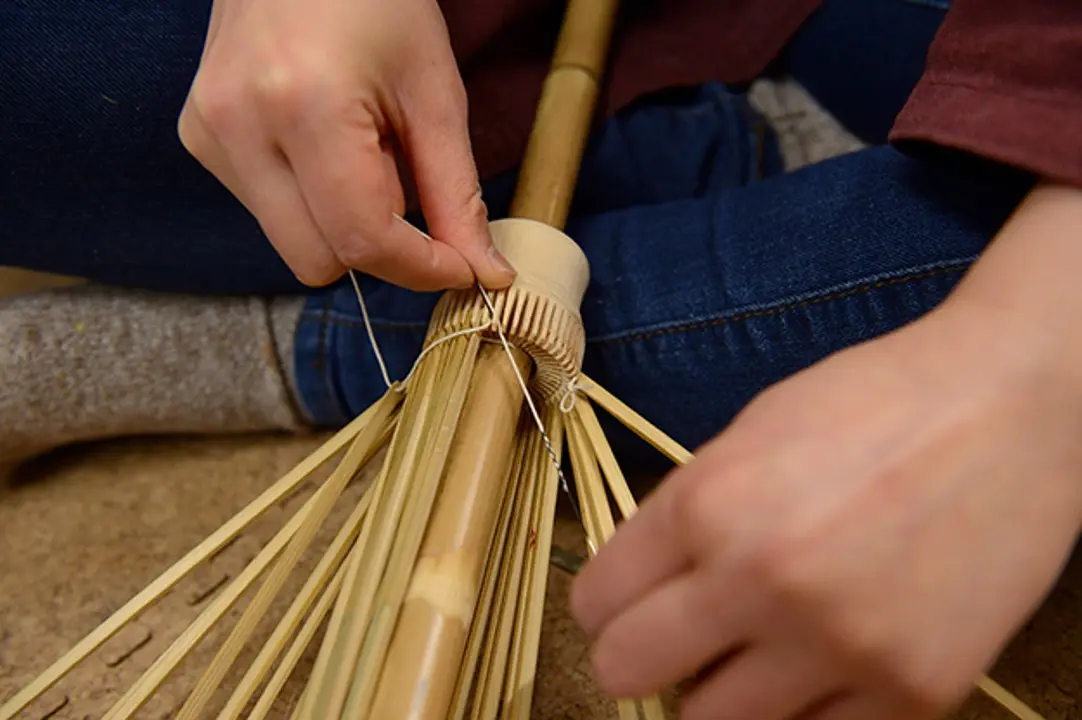
This process is carried out in four different sections in total. The rokuro is said to be made from a type of wood called chisha, which is not commonly available on the market. It is a wood known for its exceptional toughness. There is reportedly only one workshop left in the entire world, reported in Gifu Prefecture that still produces these rokuro.
②Step Two: Makuwari
The frame of the umbrella is opened to a horizontal position and secured on a workbench called a uma (“horse”). The bamboo spokes are then evenly aligned and spaced out in visual balance.

Even spacing across the bamboo ribs is critical at this point to ensure each wagasa opens correctly, all the while the natural materials of each piece offer its own quirks in the process. The craftsperson must be able to “read” these characteristics, making this a highly delicate task that showcases their skill and experience. One of the techniques is to occasionally step back and look from a distance to check the overall balance.
③Step Three: Taping with Nokigami
Washi paper is applied around the outer edge of the umbrella. This step serves to secure the spacing between the bamboo spokes just set during the makuwari process to ensure they do not shift out of alignment.
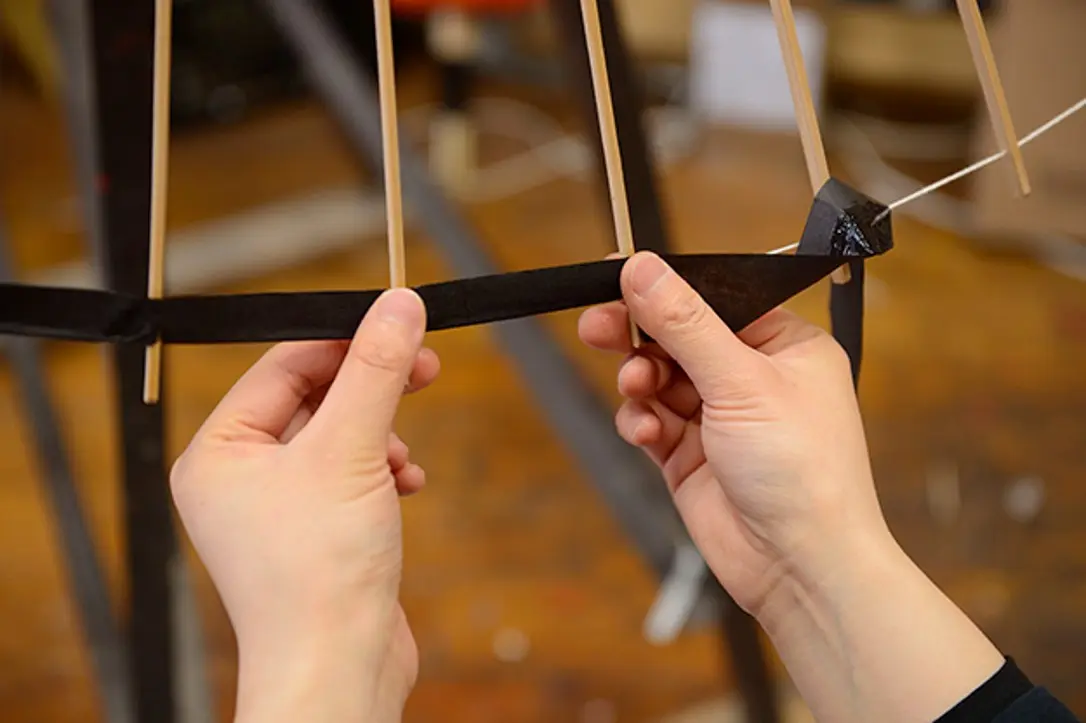
This process also protects the threads set during the first shitago step.
④Step Four: Nakaoki-gami Tape
Once the nokigami is set, a strip of wash paper is laid across the middle of the spokes. This strip is called nakaokigami.
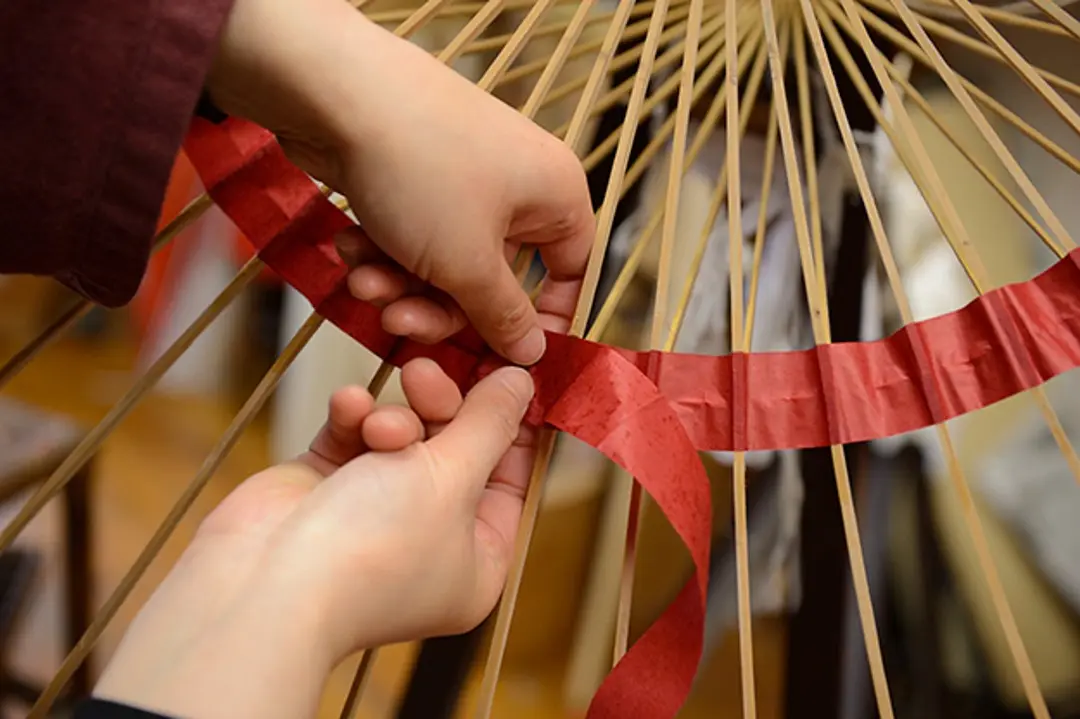
The nakabushi is the joint and movable section connecting the main rib and the minor ribs. Its role is to reduce the strain on the umbrella’s body paper (dōgami) by preventing friction that occurs during use. In the unlikely event that a minor rib detaches from the main rib, the washi paper covering this section helps prevent the body paper from tearing. Additionally, it also serves as an interior decorative element of the umbrella.
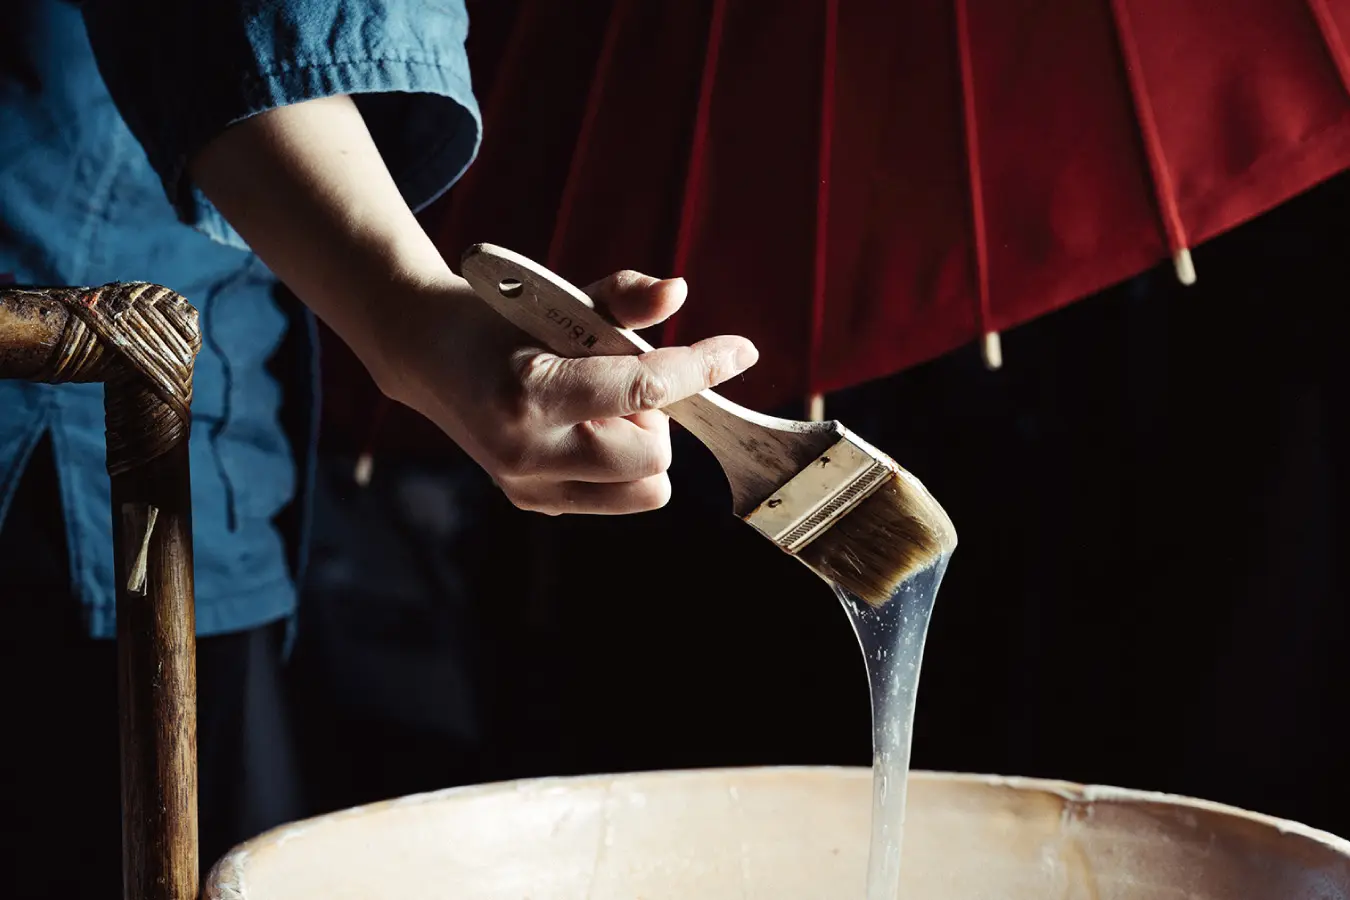
⑤Step Five: Doubari
Now begins the final paper shade setting step.
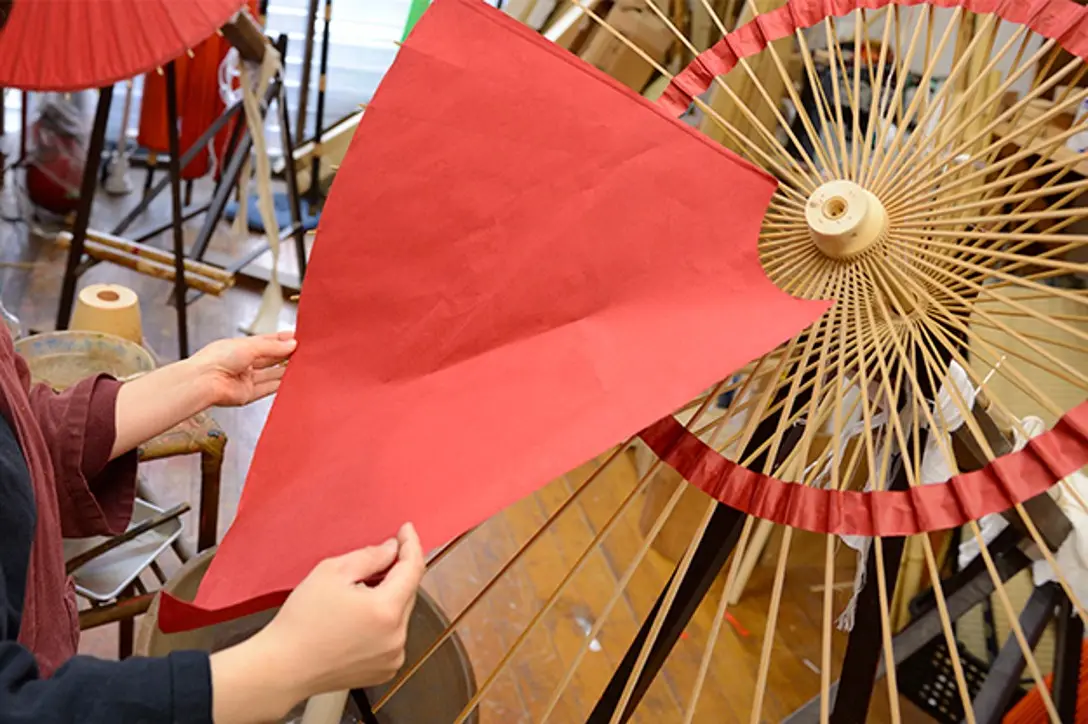
A paste made from kneaded tapioca flour is applied to the ribs using a brush. As an aside, in the past warabi (bracken) starch was used, and there’s even an anecdote that craftsmen would eat it when they got hungry. A single sheet of washi paper measures roughly 900 mm by 600 mm. Since this is smaller than the diameter of a Japanese umbrella, three to four sheets are joined together to create what appears to be a single sheet. After cutting them using a pattern, the paper is applied to the frame.
Of course, the number of sheets varies depending on the type and size of the umbrella. For common sizes such as bangasa and janomegasa, four sheets are used, whereas for large umbrellas like nodategasa, as many as 60 to 70 sheets of washi are used to create the body covering. This process is carried out using a specialized tool for umbrella making called a matabera. It is said to be the step that requires the greatest skill, making it an extremely important part of the production. After this, the paste is left to dry.
⑥Step Six: “Sugata-zuke” (Folding)
Once dried, the intricate folding begins.
To ensure that the washi develops the correct folding pattern, the umbrella is gradually closed while creasing the paper along the main ribs. Once folded, the umbrella is tightly bound with a cord to set its shape.
⑦Step Seven: Kara-maki
The body section is now complete. Next begins the finishing of the umbrella top which is affixed without any adhesive.
This process is done using only the power of the water applied to the washi. Amazing, isn’t it? The reason is that, to avoid placing excessive stress on the paper, the atamayui (head wrapping), which will be described later, must be able to shift upward along the upper part of the ten-rokuro in coordination with the umbrella’s opening and closing. A section between the ten-rokuro and the body paper (dōhari) is intentionally left without washi, and from this unpapered area toward the karamaki, the washi is applied while lifting it upward.
This part is called the mino. For the portion closer to the center of the umbrella, the washi is pressed down using tools such as the matabera, forming small pleats as it is applied. These pleats allow the washi to follow the motion of the umbrella as it opens and closes. Although it is an extremely delicate step, the process is carried out by skillfully using water and carefully assessing the strength and characteristics of the washi.
⑧Step Eight: Affixing the Atama-zutsumi
The head section is finished by applying washi so that it wraps around the very top of the umbrella.

Great care is taken to ensure that the paste does not adhere directly to the ten-rokuro. If the paper becomes fixed to the rokuro, it will be extremely prone to tearing when the umbrella is opened and closed. This is one of the more technically demanding steps. Normally, the work up to this point is completed within one to two days.
⑨Step Nine: Oiling
To make the washi water-repellent, oil is applied once to the papered areas, and the umbrella is then dried in the sun for about two weeks to one month.
This step allows the oil to set into the washi paper, creating a weather-resistant seal even usable on rainy days. Drying time needed varies by season and weather. The oils used in this step have shifted over time from persimmon tannin in the past and linseed oil today.
⑩Step Ten: Adding the “Kappa” Top
The final step. A squared nylon swatch is affixed to the Rokuro top while shaping it by hand.

Oil paper was the choice material used to close the kappa in the past, lending itself to easy repair as it was often the first to wear. Today at Hiyoshiya you’ll find the kappa is made with a nylon material instead of oil paper.
The final piece is complete once fasted with a cotton thread and loop for hanging. Incidentally, with Western-style umbrellas, you hold the handle when it is folded, but with Japanese umbrellas, the top section is kept facing upward. This is to prevent rainwater from collecting in the top part, which is made of washi paper. When placing the umbrella down, you must always keep the top facing upward.
As an added perk, there are even extra services to personalize each piece like painting the umbrella spokes or engraving a name.
With that, the wagasa is complete! The many different steps lead to this one-of-a-kind finished wagasa, each beaming with the sheer skill of the craftsman behind it.
A Mini Wagasa Building Workshop to Try!
Hiyoshiya: Veteran Kyo-Wagasa Maker since the Late Edo Period
Founded in the late Edo Period, Hiyoshiya has remained an esteemed maker of Japanese wagasa umbrellas in Kyoto for over 150 years.
Among Japanese umbrellas, those made in Kyoto are called Kyōwagasa and have long been cherished as exceptional traditional crafts of the region. They are well known for items such as the formal nodate-gasa used by the heads of tea ceremony schools and the janome-gasa beloved by geiko and maiko, and they have been appreciated for generations.
Today, Hiyoshiya is the only remaining workshop that continues to preserve the craftsmanship involved in making this quintessentially Kyoto traditional craft, the Kyōwagasa.
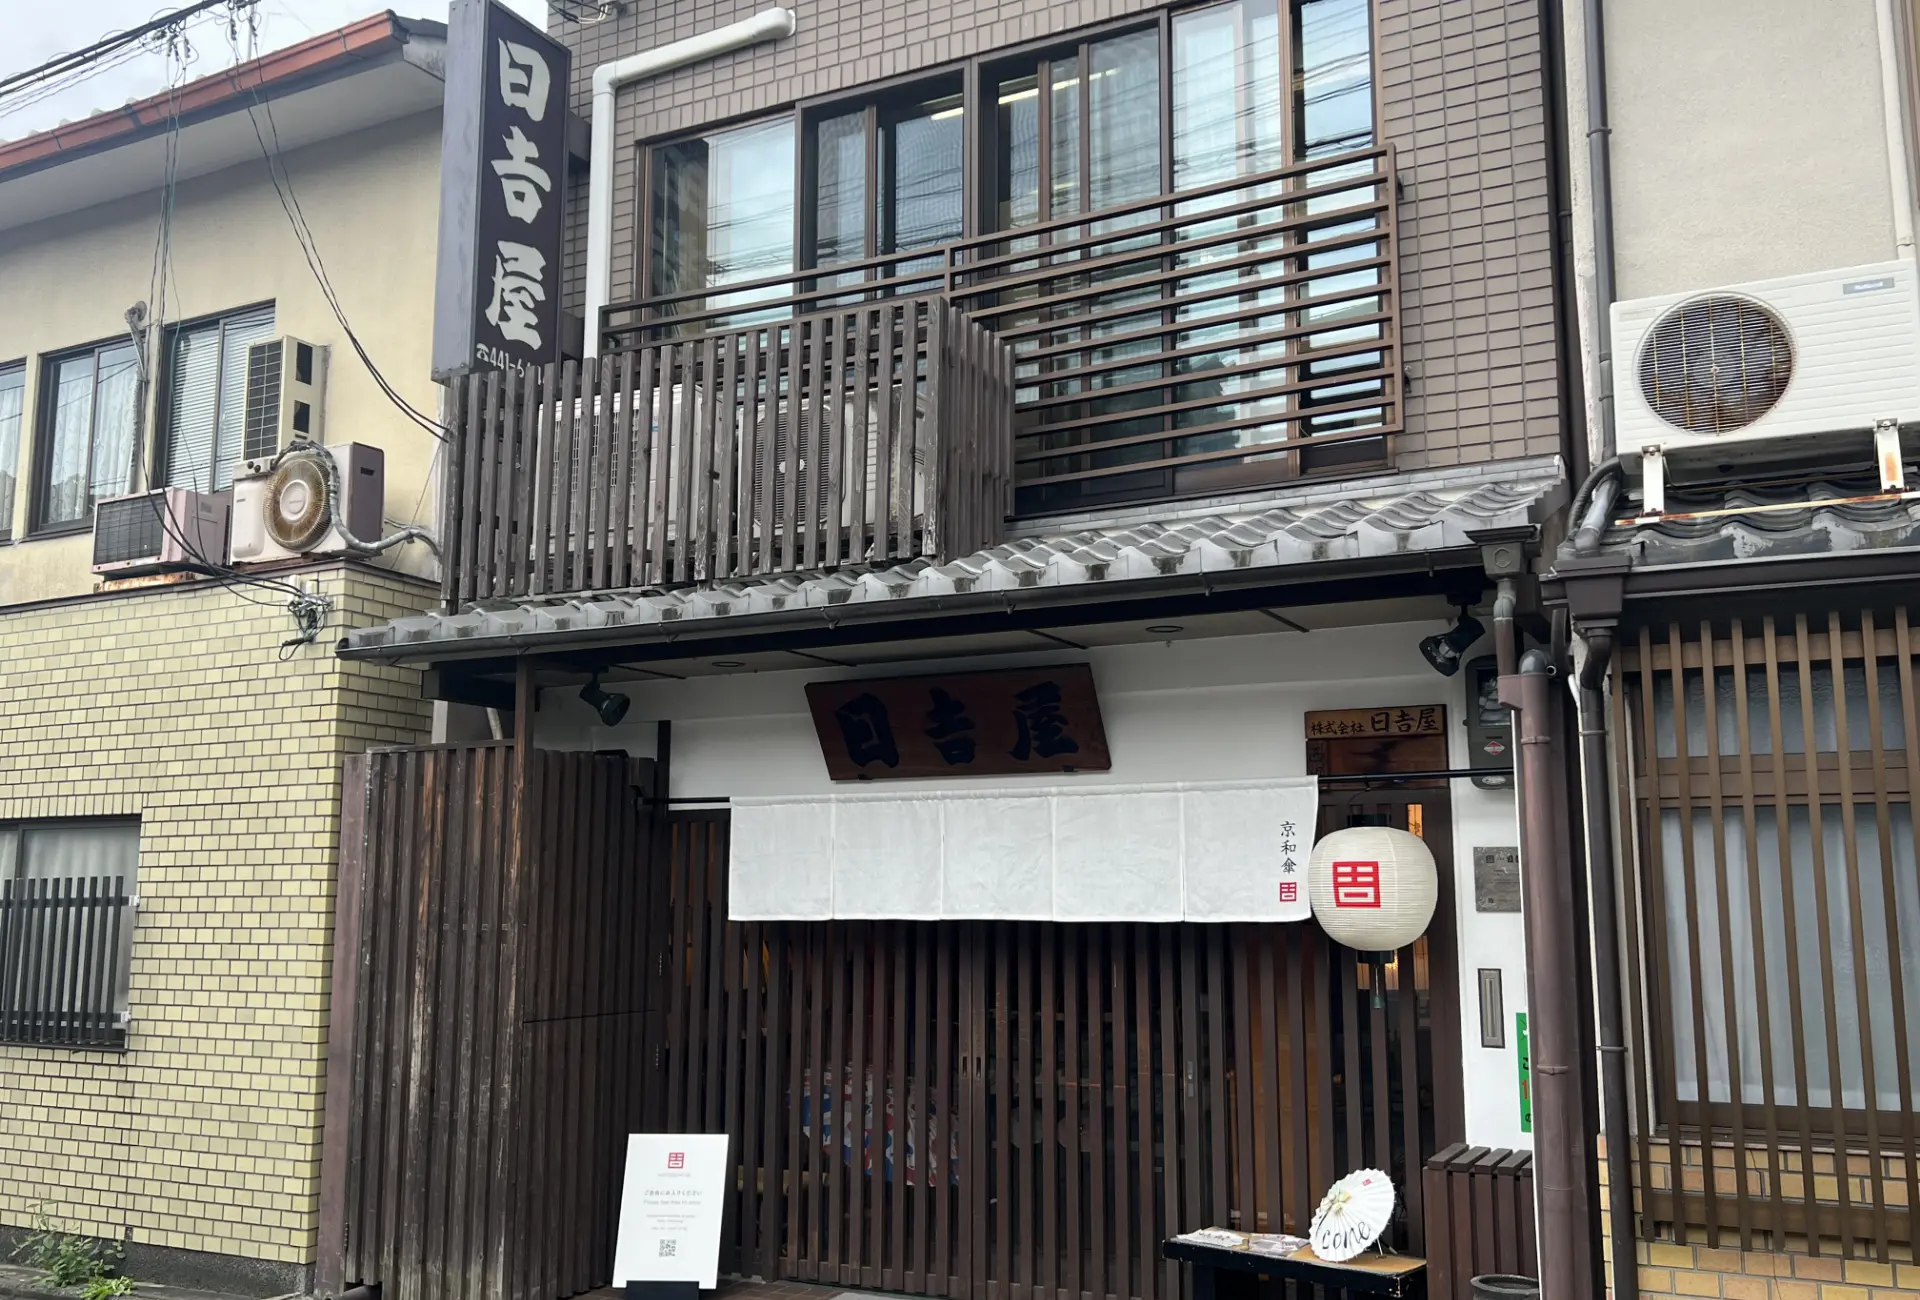
In sum, this makes Hiyoshiya the only maker of Kyo-wagasa umbrellas remaining in Kyoto today. The origins of Hiyoshiya date back to the late Edo period, when its founder opened an umbrella shop within the grounds of Honkakuji Temple in the Gojō area of Kyoto. Today, the shop stands along Teranouchi Street, an area lined with tea ceremony rooms belonging to the heads of tea schools, as well as shops specializing in tea utensils.
The Kyōwagasa made by Hiyoshiya play an essential role not only in the world of tea ceremony but also in traditional performing arts such as kabuki and nō, adding elegance and refinement. Although the number of people who use Japanese umbrellas in daily life has dwindled over time, they are still employed in numerous traditional events, rituals at shrines and temples, and festivals throughout Japan.
By crafting and repairing these umbrellas with techniques honed over generations, Hiyoshiya contributes to the preservation and continuation of Japanese culture. They also develop new products that adapt the excellent structure and traditional beauty of Japanese umbrellas for modern use.
Shop Details
- Business Name
- Hiyoshiya Workshop
- Address
- 546 Dodo-cho, Horikawa Teranouchi-higashi-iru, Kamigyo-ku, Kyoto
- Phone
- 075-441-6644
- FAX
- 075-441-6645
- Open Hours
- 10am-5pm
- Regular Holidays
-
Saturdays, Sundays & New Years Holidays
※Advanced reservations required for Saturday appointments. Please call at least three days in advance to reserve. - Access
-
【By Train】From JR Kyoto Station, take City Bus #9. For subways, take the train to Imadegawa Station, get off an dwalk about 15 min. to arrive. Via the Hankyu line, take the train to Shijo-Omiya Station, go out onto Horikawadori and take a #9 or #12 city bus.
【By City Bus】From JR Kyoto Station, take a #9 bus bound for Nijo Castle, or if heading towards Shijo Kawaramachi take a #12 bus to the nearest statino, Horikawa Teranouchi, get off and walk about 1 minute to arrive. - Official Website
- Official Website
Repertoire of Wagasa Made Here
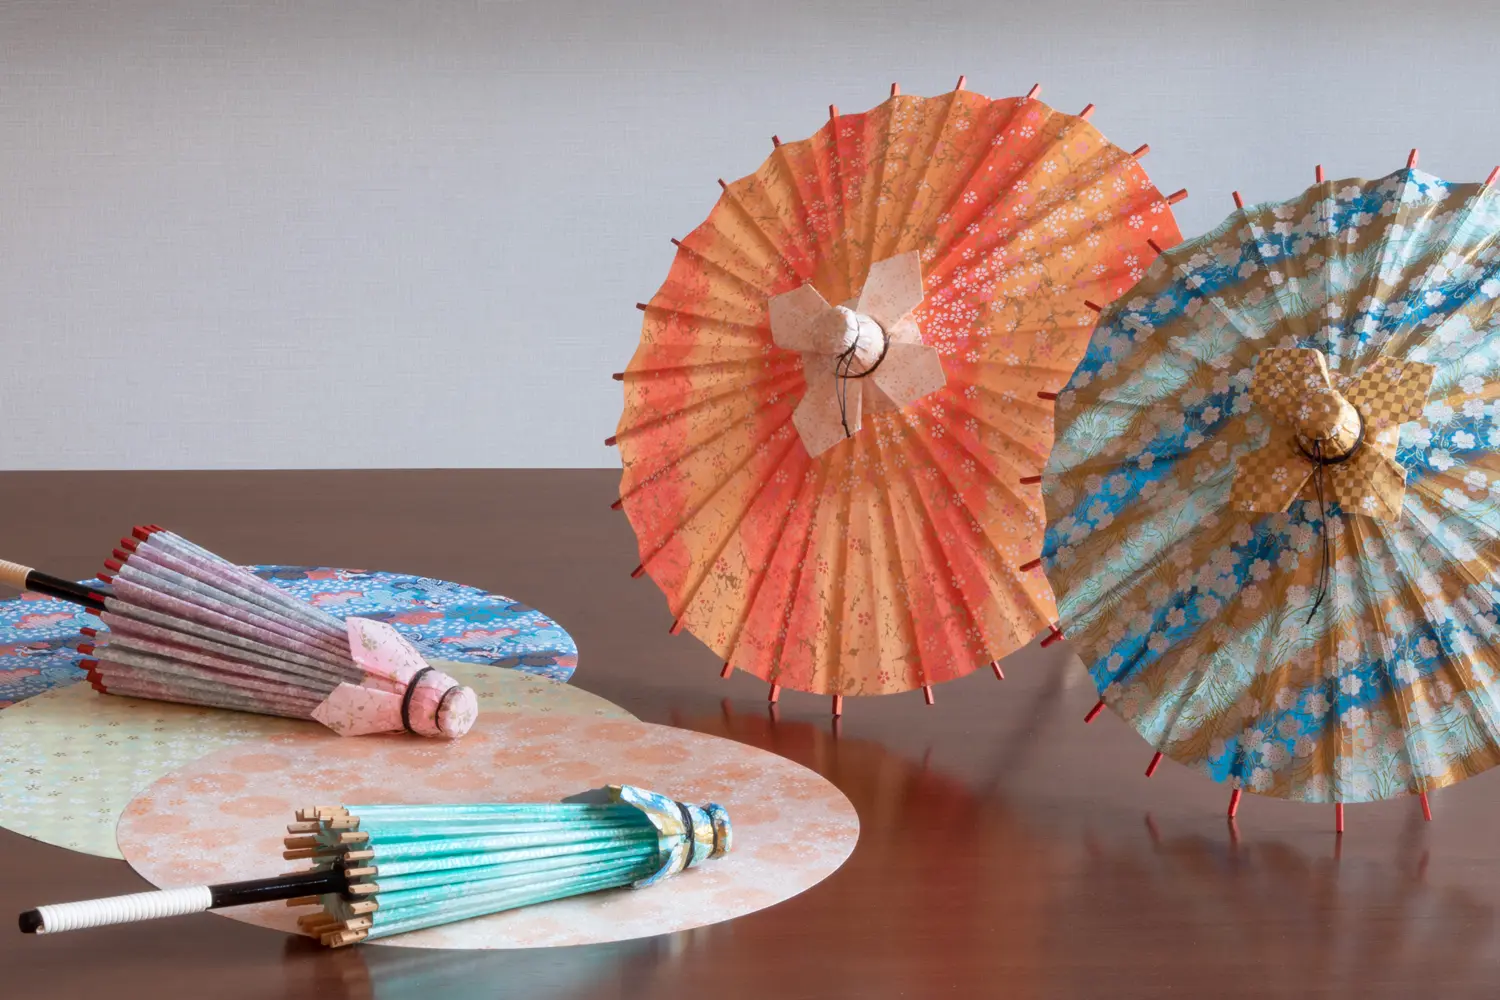
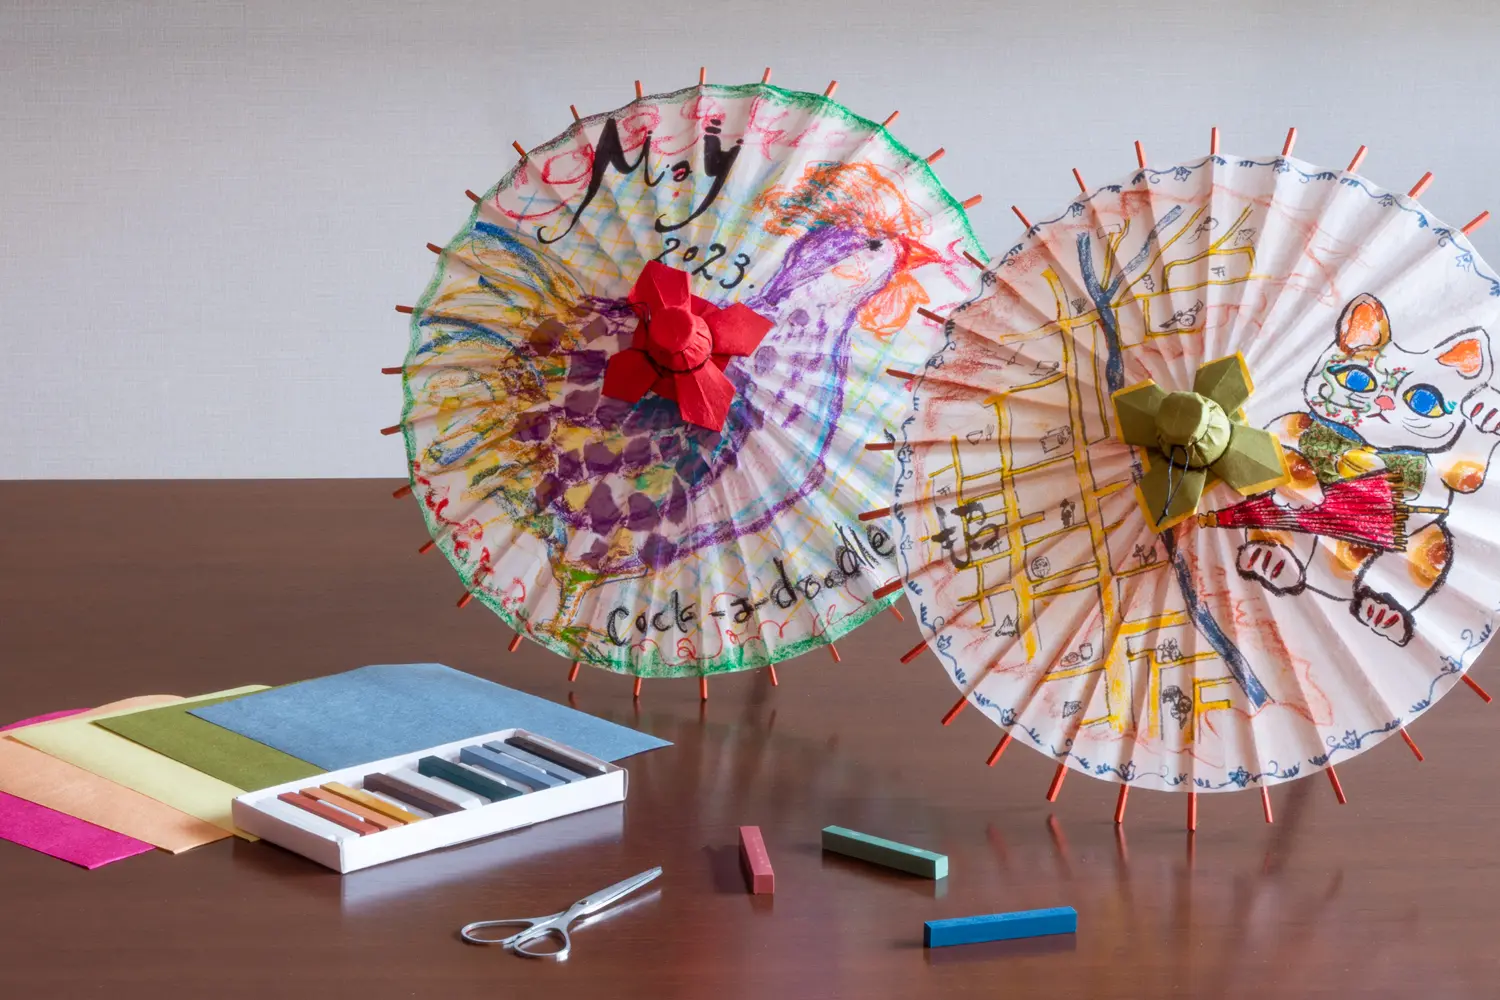
Visitors to Hiyoshiya will find an unwavering commitment to the craft of making Kyo-wagasa pieces, including nodate-gasa that embody the tea schools’ pursuit of wabi-sabi, as well as everyday bangasa and janome-gasa, thereby preserving the tradition of Japanese umbrella craftsmanship. At the same time, they are also committed to creating new, design-oriented styles of Japanese umbrellas
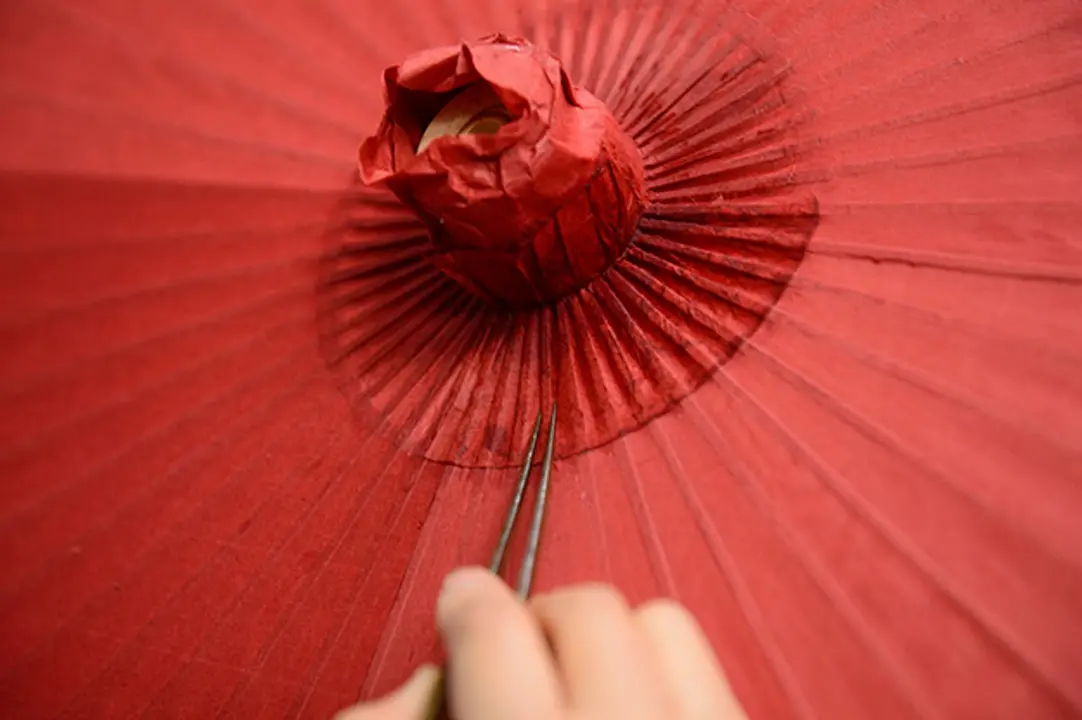
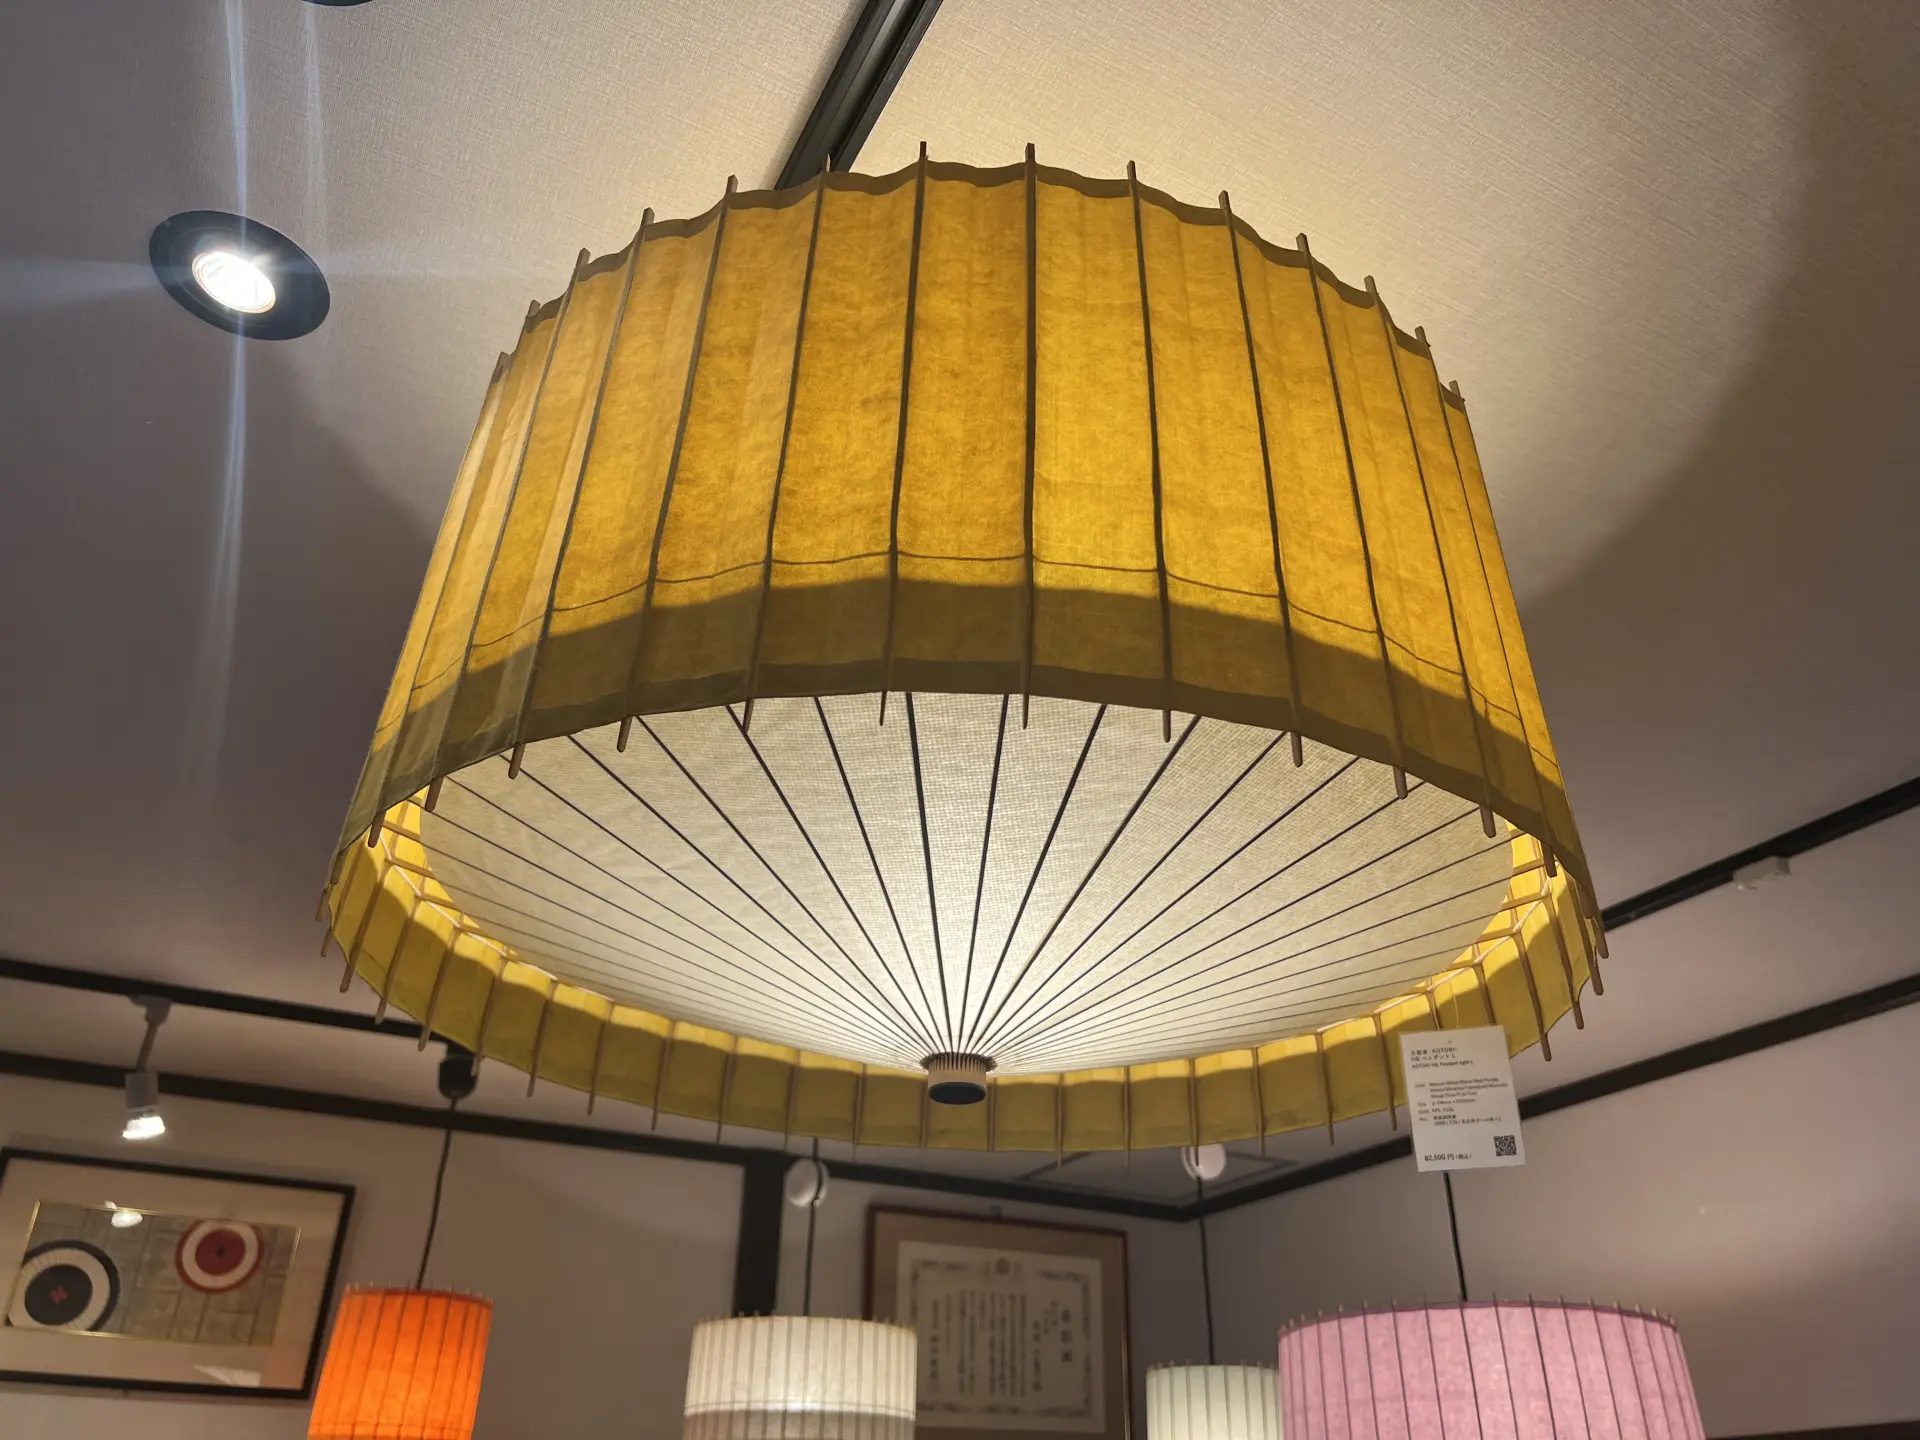
Wagasa fashioned to resemble cherryblossoms and gingko leaves. These particular designs are especially popular among global tourists. The shop says the secret is to cut the lattice frame after assembling it and before adding the paper shade to achieve the laurel shapes. Outside of wagasa, there are even interior delights to browse like a lamp shade fashioned with the same construction of a wagasa umbrella.
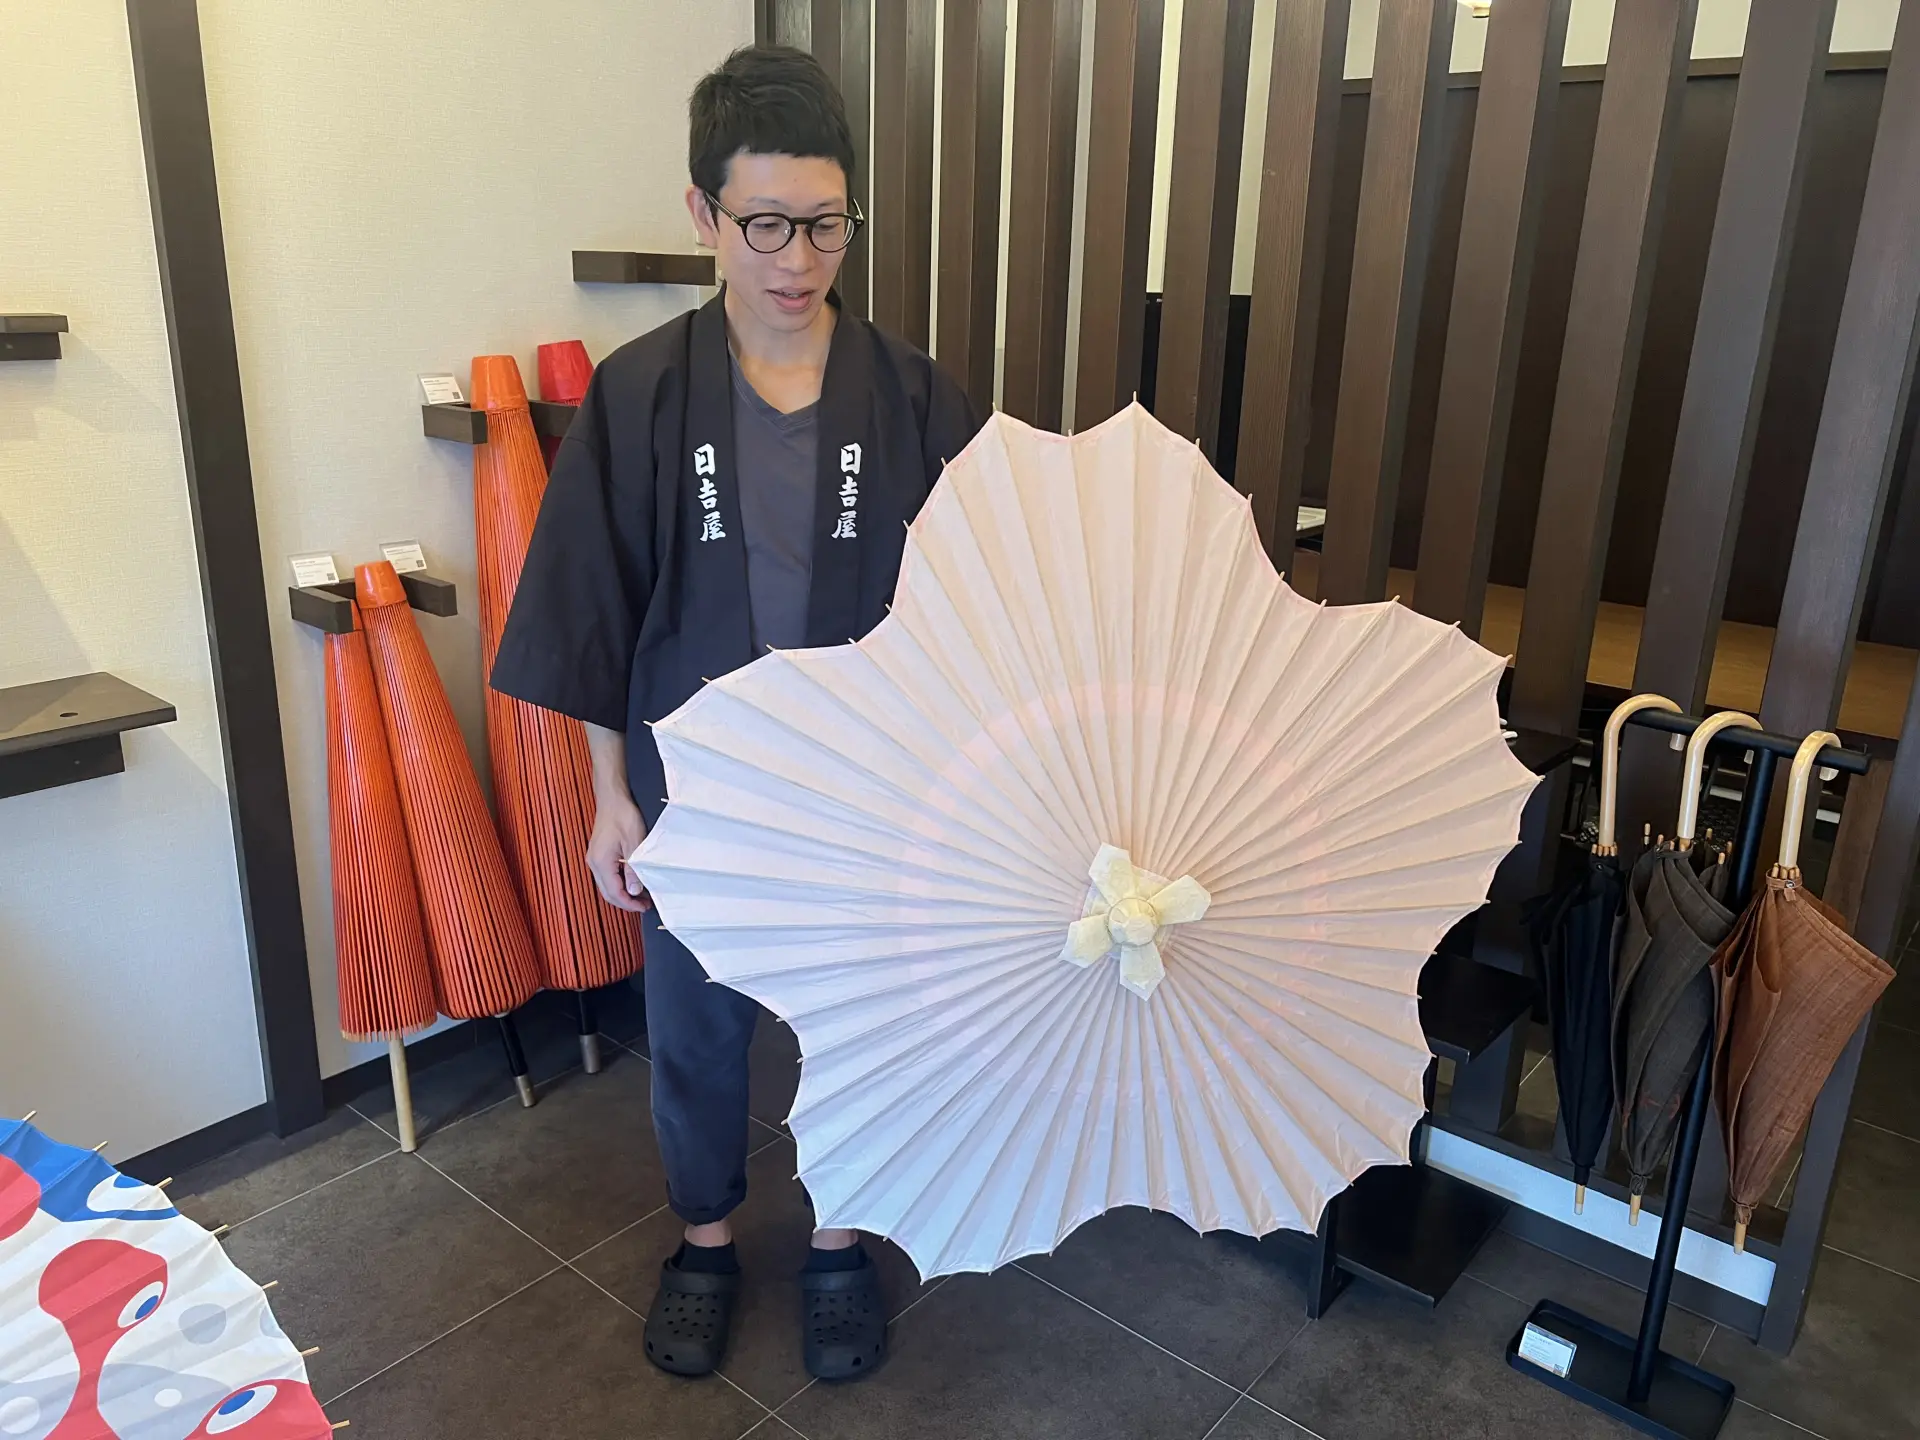

Coveted designs in wagasa umbrellas and delightful interior designs. Here’s a lamp shade made with the same construction of a wagasa umbrella. The designs are often spooted in high-end hotel lobbies or eateries, but they are also available for purchase.
Full Menu of Workshops to Try
The heritage craft of wagasa umbrellas continues on at Hiyoshiya via hands-on workshops. Mini-sized and ready to travel, there’s a 90-minute crash course workshop that draws many in to make their own take-home souvenir.
The experiences are held at the Hiyoshiya Workshop. (Held on floors 1, 2, or 3 on site at 546 Dodo-cho, Horikawa Teranouchi-higashi-iru, Kamigyo-ku, Kyoto. No elevator available.)
The workshop is conducted in Japanese, or with the help of a translation app. More than half of the participants are foreign tourists, showing just how popular this experience is among visitors from overseas. Through making a Japanese umbrella, we invite you to experience traditional Japanese craftsmanship up close.
All workshops require advance reservations through the application form at least seven days in advance.)
①Mini Wagasa Workshop (90 min)
This coveted workshop offers a chance to make a miniature Japanese umbrella with a diameter of about 30 cm, along with a tour of the umbrella workshop. You will receive guidance on how to make the mini-sized umbrella, and you can also observe craftsmen at work as they create full-size Japanese umbrellas. You may take your completed piece home with you.
- Workshop Hours
-
Weekly Mon. - Fri.: 11am-11:30am / 2:00pm - 3:30pm
※Must be booked 7 days in advance - Time Needed
- Approx. 90 min.
- Fee
- 8,800 JPY/per person (tax included).
- Participants
-
Must book for two or more, up to 20 seats available per workshop
※Workshop is fully booked once all seats are reserved.
Hiyoshiya's Workshop Experience Reservation Form
All workshops require advance reservations through the application form at least seven days in advance.
②Mini Wagasa Collage Workshop (60 min)
This course includes making a miniature Japanese umbrella with a diameter of about 30 cm, along with a tour of the umbrella workshop. You will receive guidance on how to make the mini-sized umbrella, and you can also observe craftsmen at work as they create full-size Japanese umbrellas. You may take your completed piece home with you.
- Workshop Hours
-
Weekly Mon. - Fri.: 10am-11am / 2pm - 3pm
※Must be booked 7 days in advance - Time Needed
- Approx. 60 min.
- Fee
- 4,950 JPY/per person (tax included).
- Participants
-
Must book for two or more, up to 20 seats available per workshop
※Workshop is fully booked once all seats are reserved.
Hiyoshiya's Workshop Experience Reservation Form
All workshops require advance reservations through the application form at least seven days in advance.
③Mini Kotori Table Lamp Workshop (90 min)
This workshop highlights the steps used to make a mini “kotori” table lamp out of wagasa umbrella techniques, plus a backstage studio tour. The kotori lamp comes in a mini size of just 14cm in diameter that finishes easily by setting a little light inside.
- Workshop Hours
-
Weekly Mon. - Fri.: 10am - 11am / 2pm - 3pm
※Must be booked 7 days in advance - Time Needed
- Approx. 90 min.
- Fee
- 8,800 JPY/per person (tax included).
- Participants
-
Must book for two or more, up to 20 seats available per workshop
※Workshop is fully booked once all seats are reserved.


Hiyoshiya's Workshop Experience Reservation Form
All workshops require advance reservations through the application form at least seven days in advance.
④Wagasa Workshop Tour (30 min)
A backstage glimpse into the studio that makes celerated wagasa umbrellas even today. You’ll even have a chance to hear straight from the makers. See the making process up close and enjoy a deep dive into the heritage craft that keeps the tradition alive today.
- Workshop Hours
-
Weekly Mon. - Fri.: 10am-11:30am / 2:00pm - 3:30pm
※Must be booked 7 days in advance - Time Needed
- Approx. 30 min.
- Fee
- 4,400 JPY/per group (tax included).
- Participants
-
Approximately1-8people per group
The fee is charged per group, regardless of the number of participants.
Hiyoshiya's Workshop Experience Reservation Form
All workshops require advance reservations through the application form at least seven days in advance.
Mini Wagasa Workshop at a Glance
A deeper understanding of wagasa umbrellas at your fingertips with this mini wagasa making experience.

Walk in to an eye-catching spread of colorful washi papers.
-
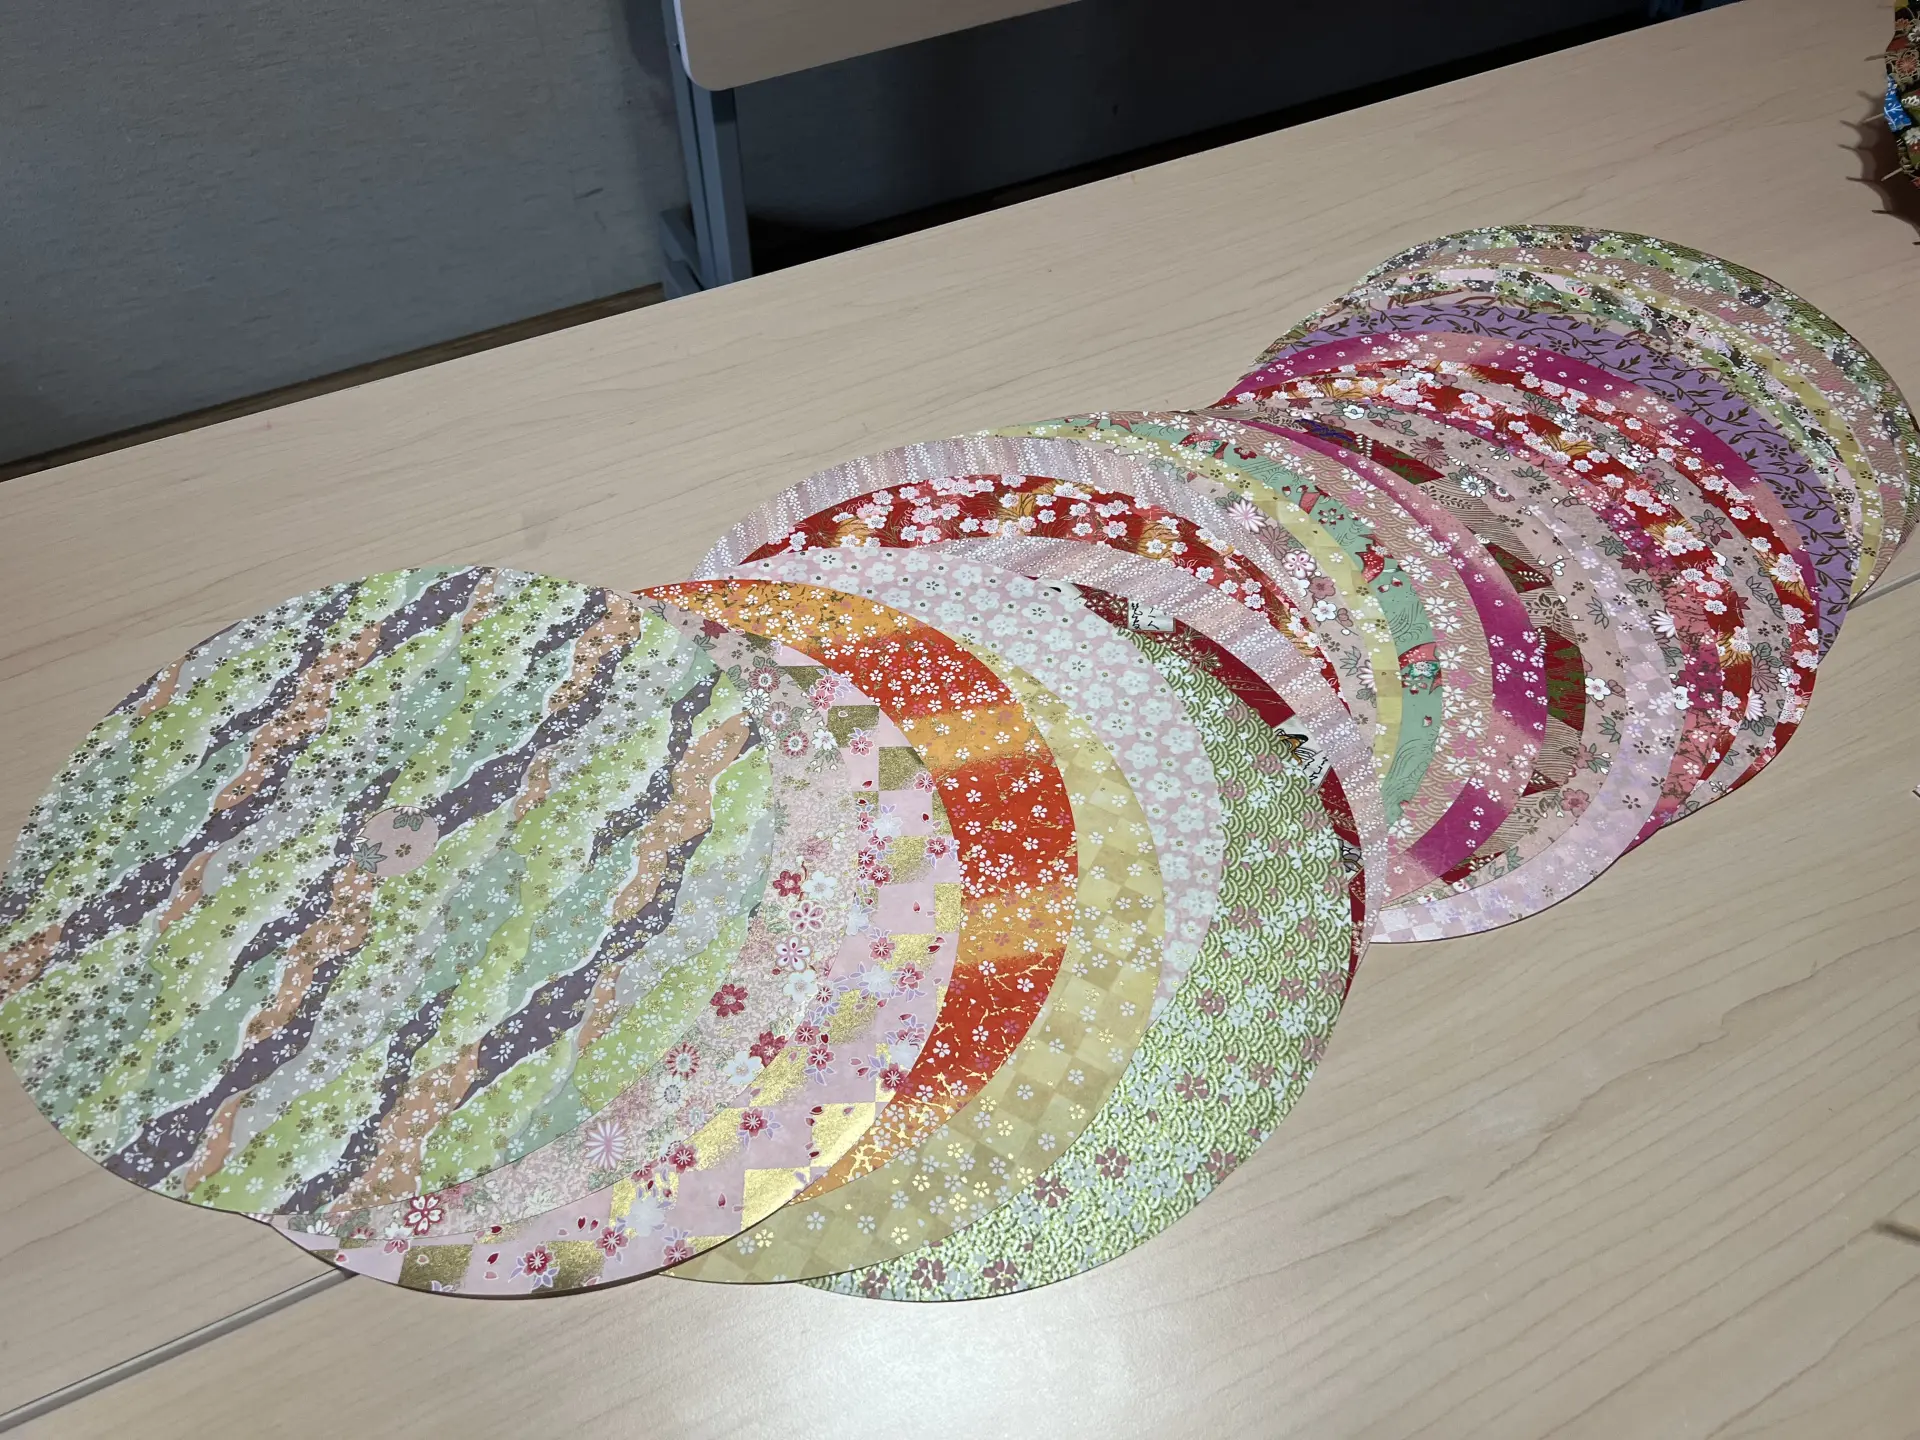
Colorful sheets of wagashi paper to sift through
-

Colorful sheets of wagashi paper to sift through
Kick off by choosing a washi paper, designs each for the body and umbrella top. There are 20 to 30 types of each, so it can be hard to choose, and the craftsman said that many people take their time choosing, so please take your time and don't worry. The washi paper is dyed using the same method as Kyo-Yuzen dyeing. Some have glitter or gold leaf, so it's hard to choose.
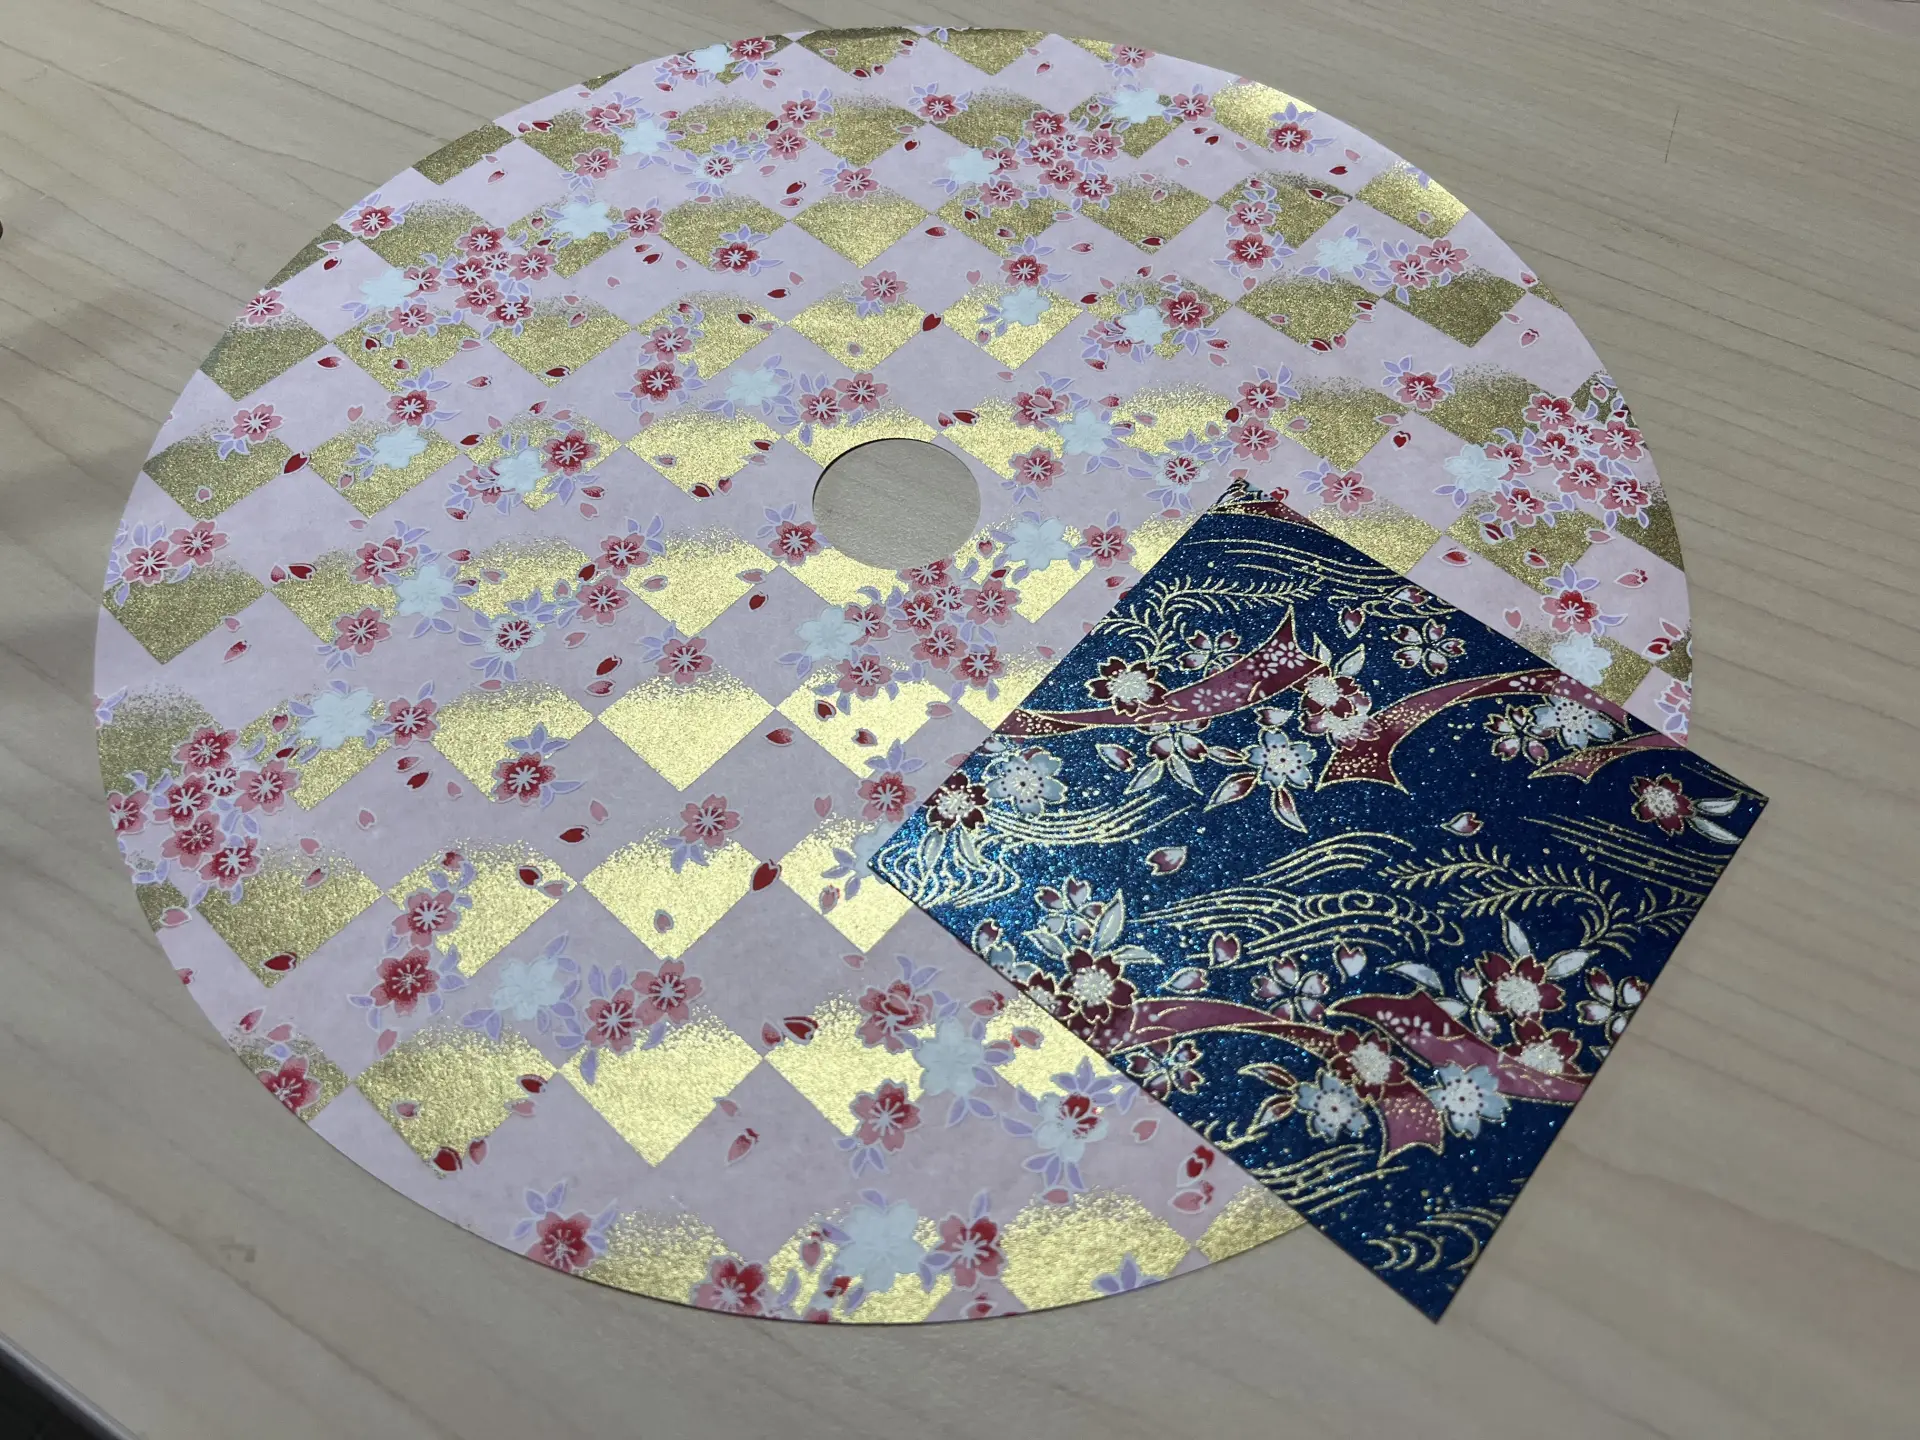
The combination of colors and patterns for the body and head changes the full look and feel of each piece, so be sure to take your time choosing. On this day, we heard that cherry blossom patterns are popular, and went with a light pink Japanese paper with gold leaf and a cherry blossom pattern for the body, and navy blue Japanese paper with glitter all over for the head. The final design is a much awaited surprise.
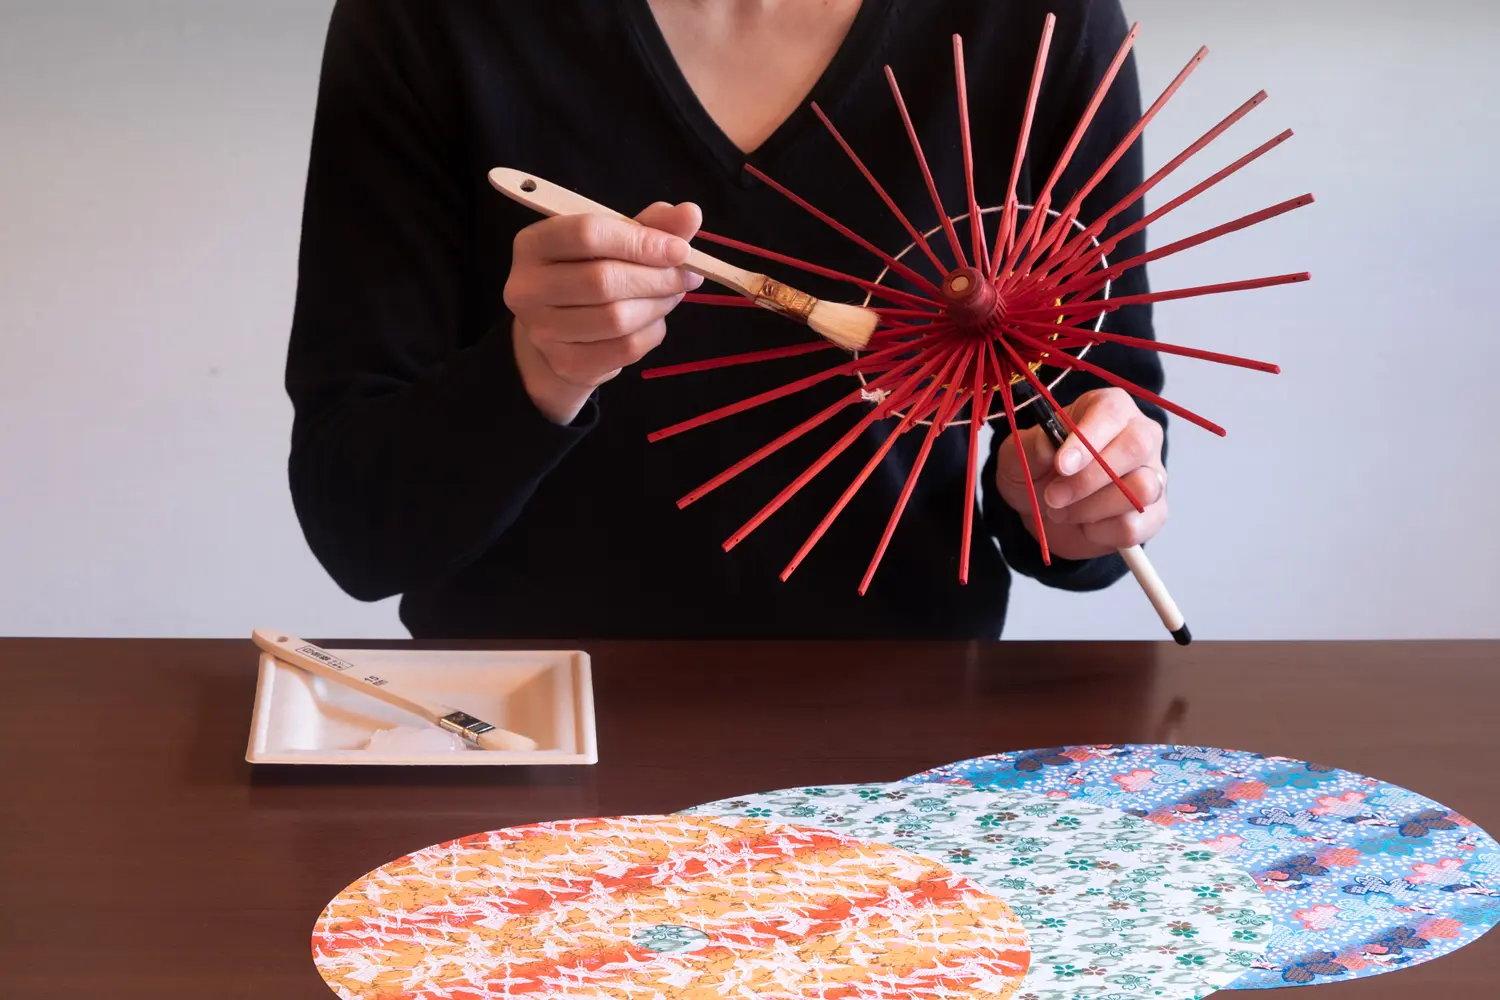
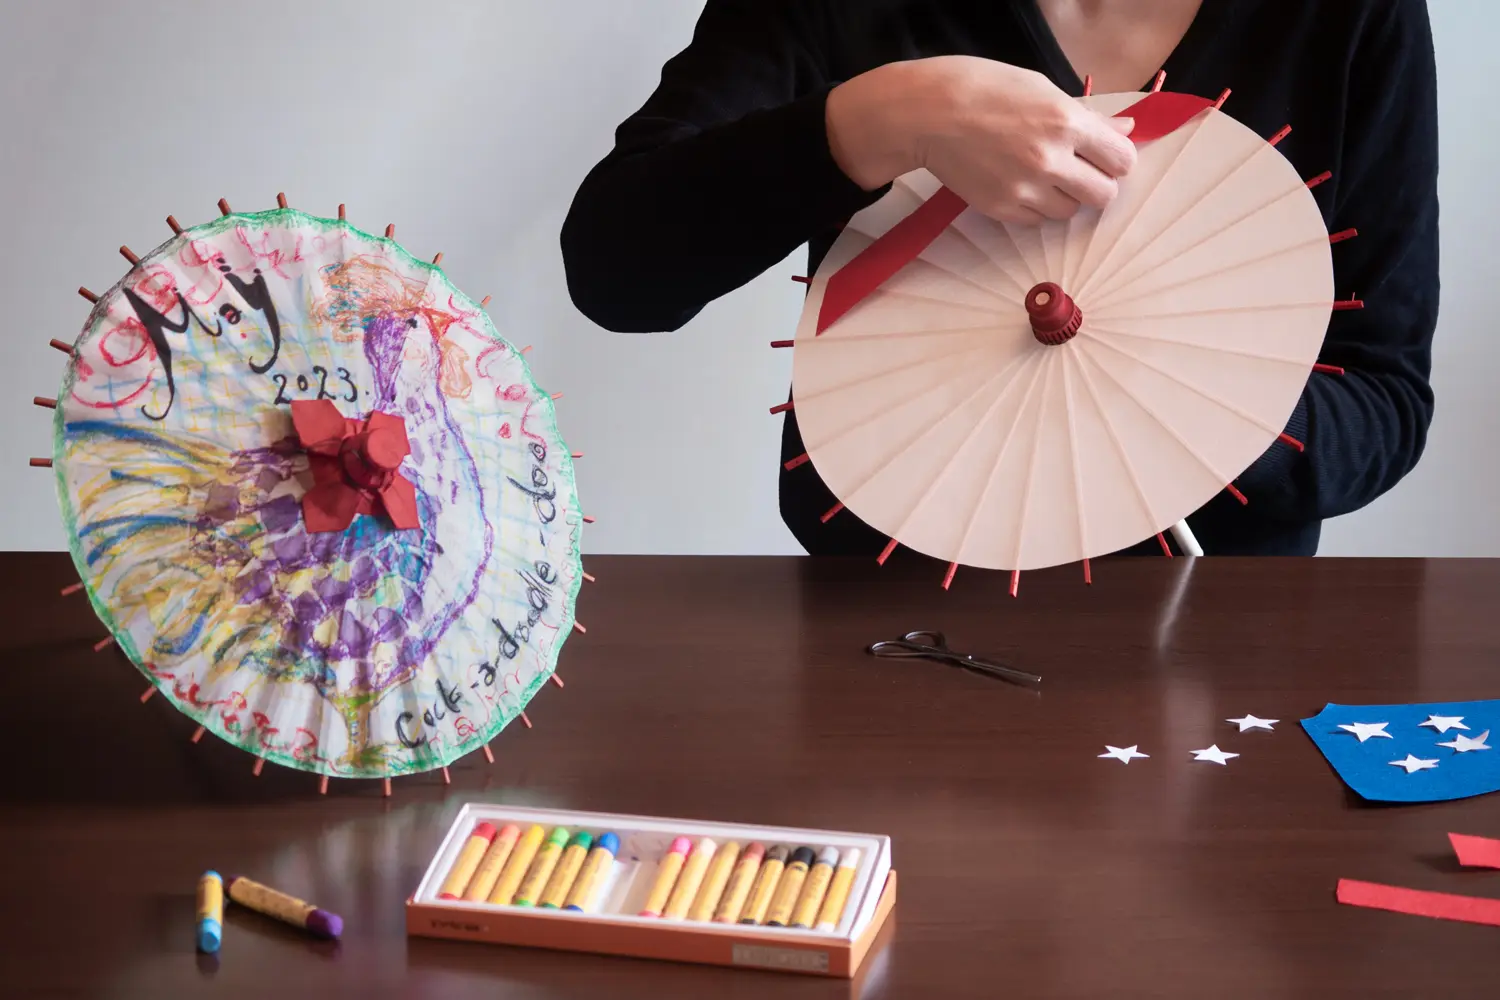
Next, apply glue to the bamboo frame with a brush. Instead of applying it in a quick line, apply the glue in a piling manner.
This glue is called shoji glue, and is used on the shoji screens found in traditional Japanese rooms. The real glue is made from tapioca flour, and I heard that bracken flour was used in the past. The glue becomes unusable once it dries, so you only knead as much as you will need. There are 28 bamboo spokes. Concentrate and carefully and quickly apply the glue to the thin bamboo ribs so that no areas are left uncoated.

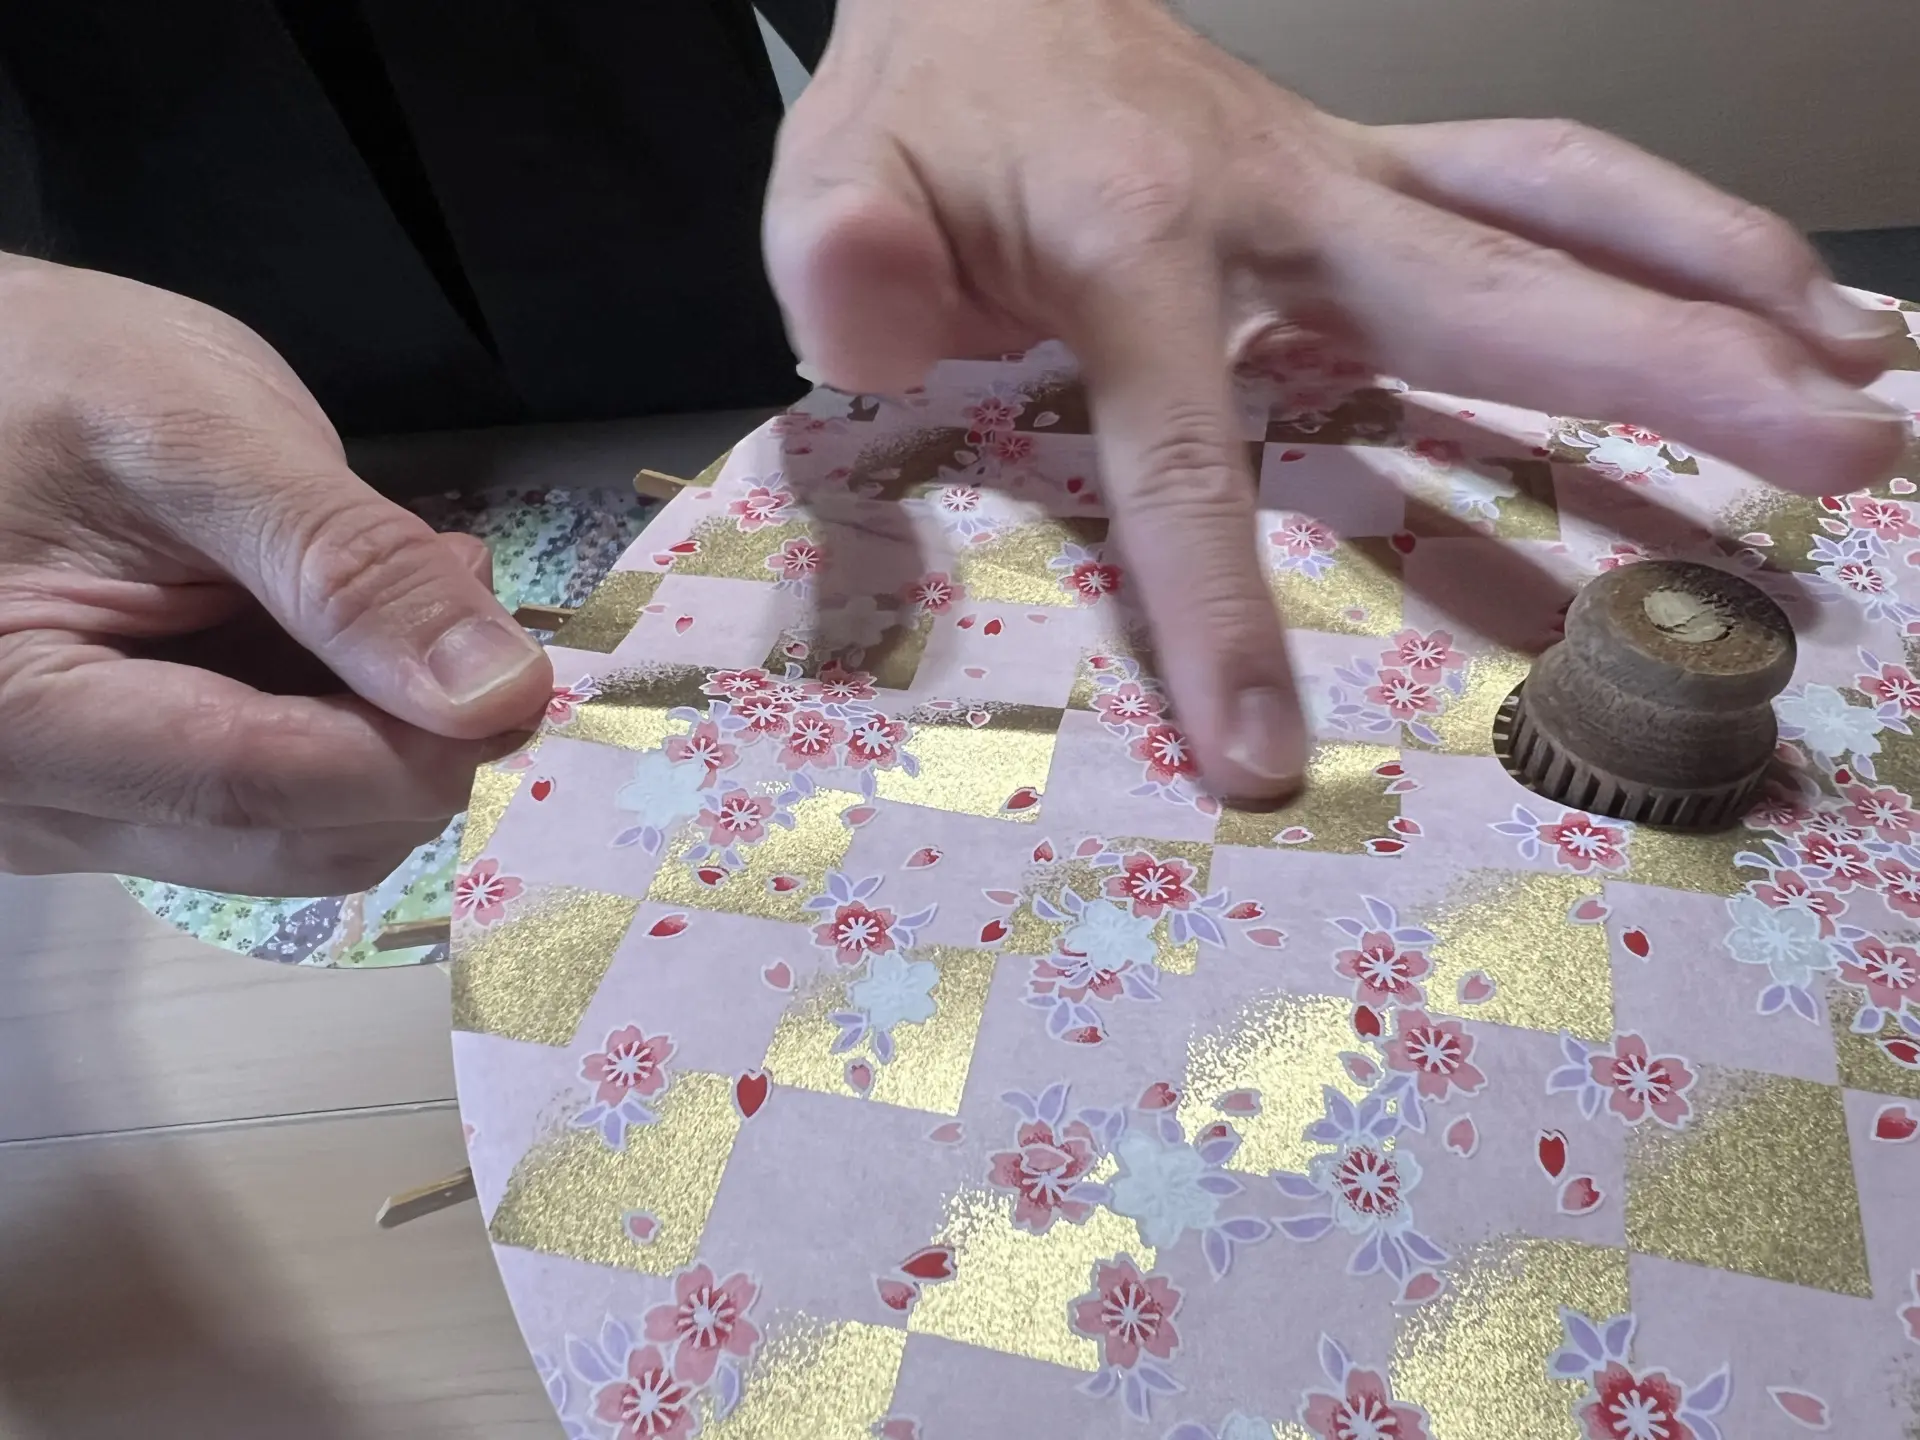
Once all the bamboo spokes have been coated with glue, attach the circular pieces of washi paper to the bones. Gently press the bamboo bones onto the washi paper so that the paper and bones are firmly glued together.
Once everything is attached, the lattice bone is traced over the washi paper with a fingernail to increase adhesion.
After this, it is left to dry for about 15 minutes. During this time, we were shown a detailed explanation of the process that goes into making washi paper using a flip chart. It was a moment when we were reminded once again of the many steps that go into making a single roll of washi paper. After being further explained about the process, we were given a tour of the workshop!
On this day, three female craftsmen were repairing Japanese umbrellas. Although they call it a repair, I was told that it is more like rebuilding the umbrella from scratch, replacing the washi paper and restoring the shape, except for the basic frame. They opened up the large umbrella and did everything by hand. What's more, it was surprising that the entire process, up to the oil painting, was usually completed in one day.
After the tour, we went back to the classroom. The final step is the very important step of making a Japanese umbrella: "shaping." Shaping is the process of making folds on the ribs and folding the washi paper between the ribs inwards to make a valley fold.
Turn the umbrella upside down so that the top is facing downwards and close it slightly. Then, hold two adjacent bamboo ribs together with your fingers. This will bring the washi paper to the inside, and you can then fold it in half.
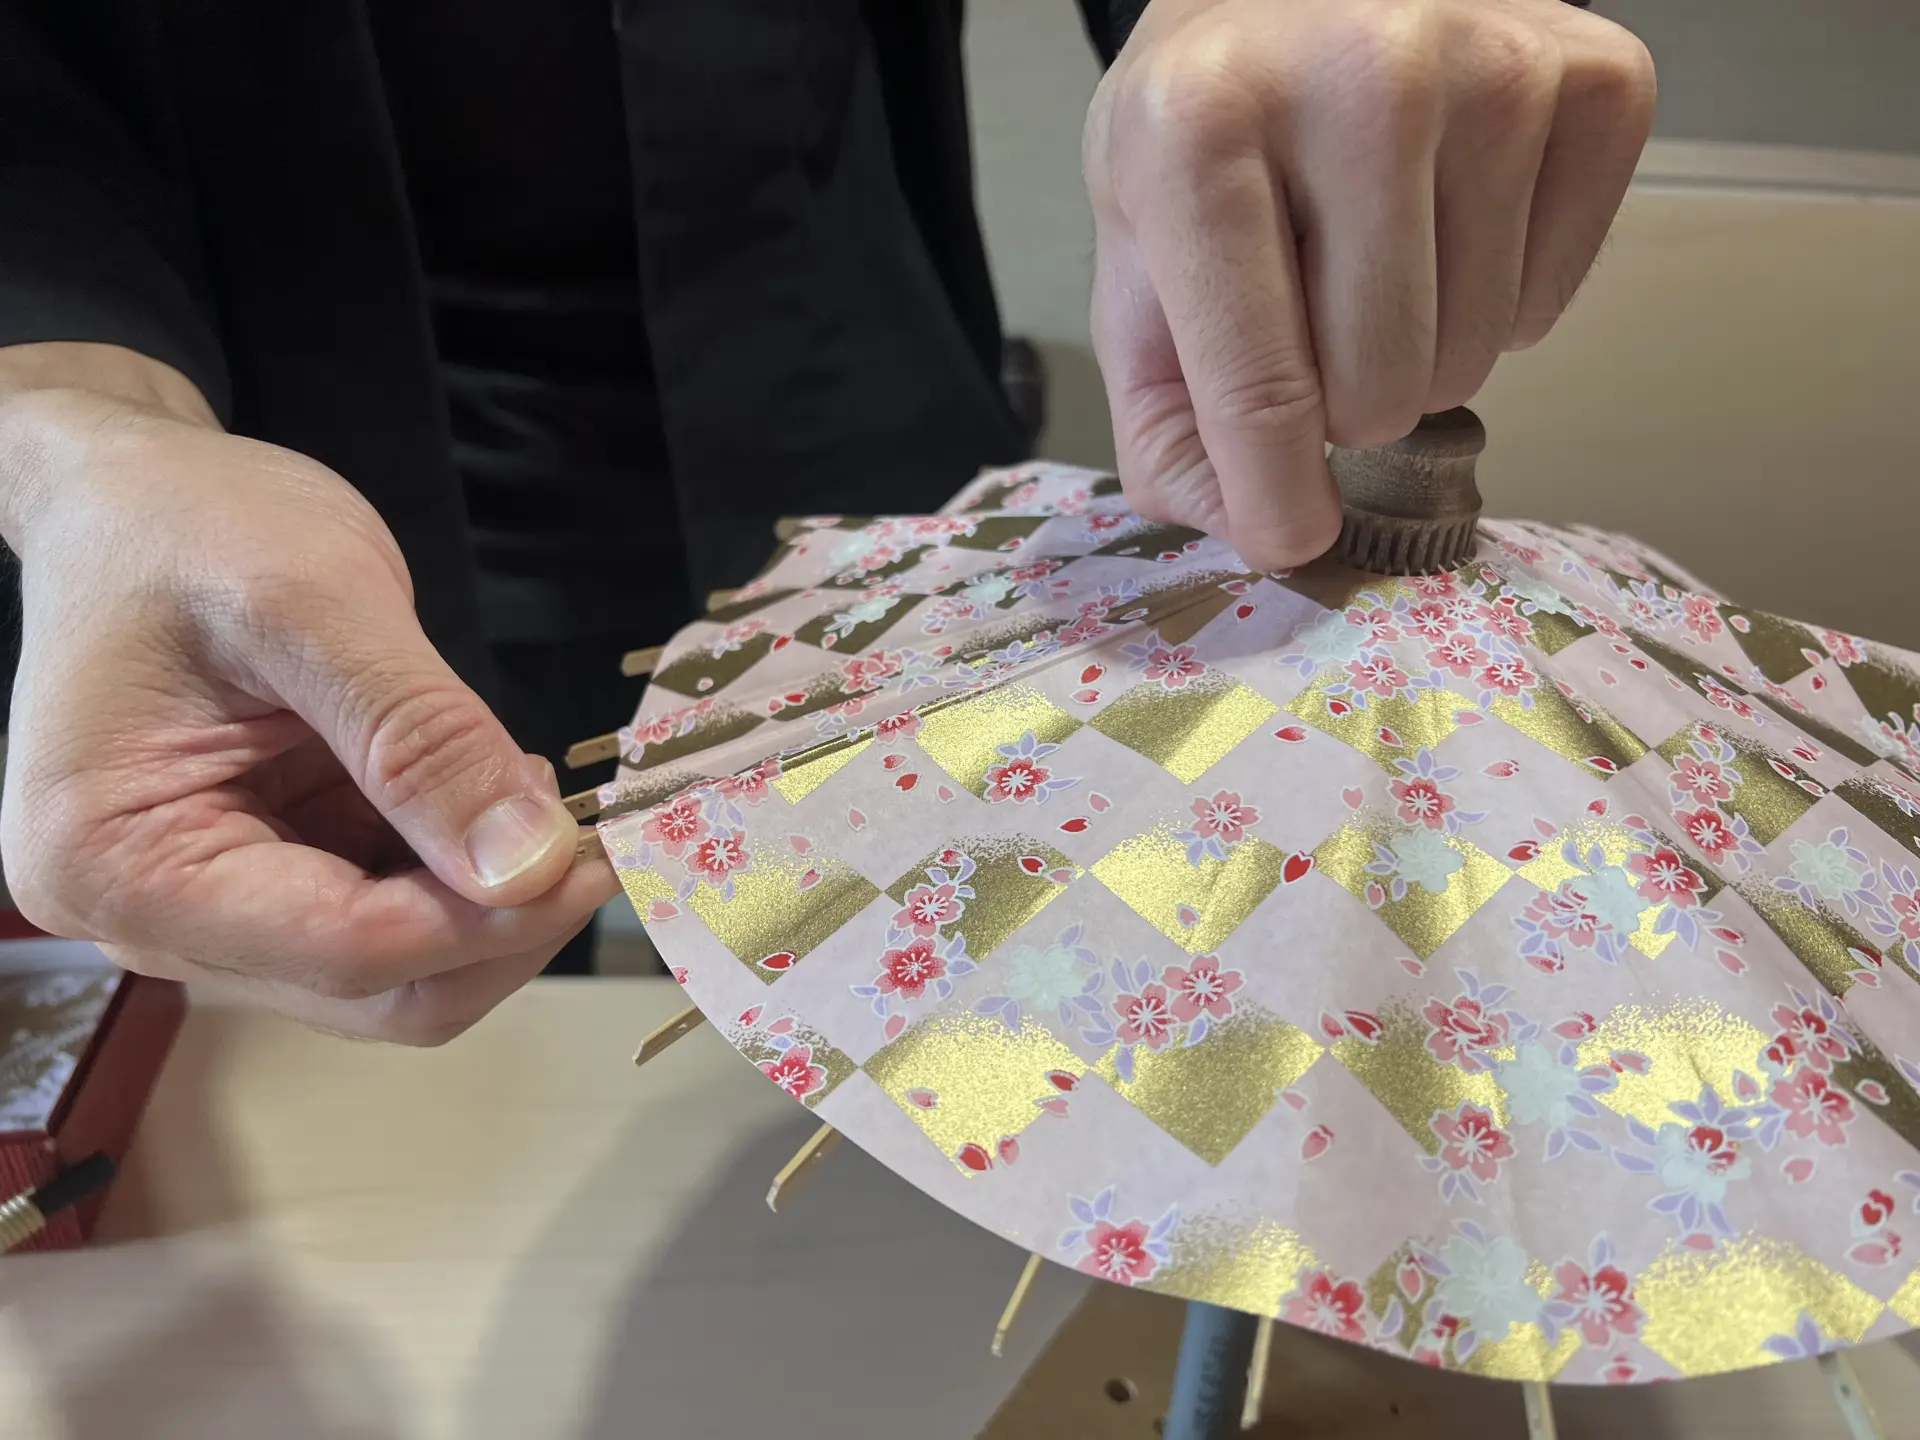
Repeat this again and again until the final umbrella is ready.

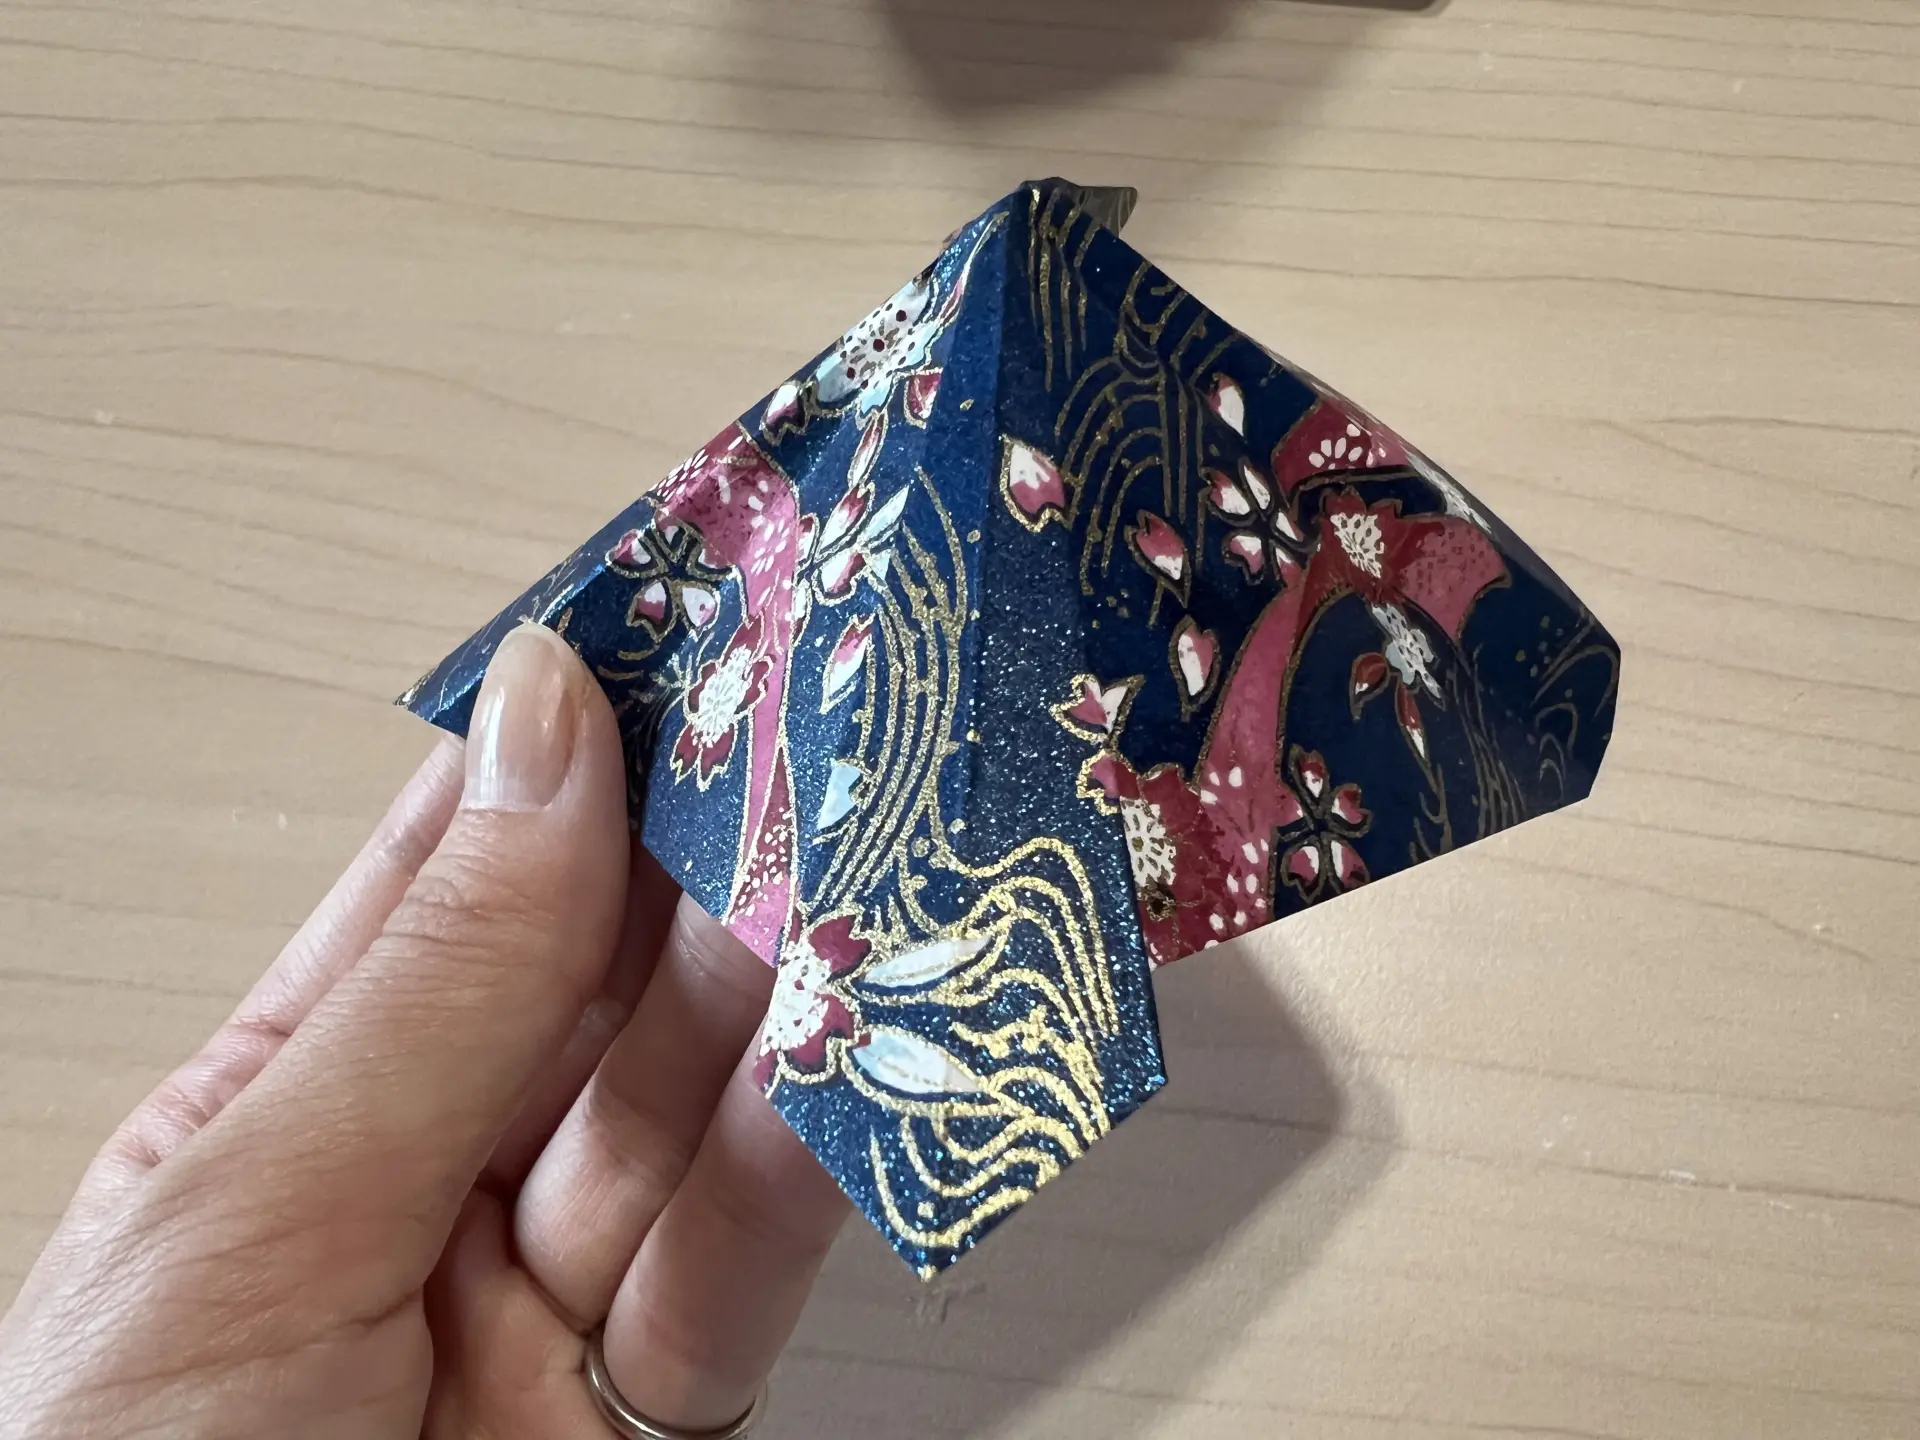
Finally, its time to make the cap. Fold the square origami paper twice into a triangle and make a slight crease inward on both long sides. Turn it over and fold the creases to the other side. Open it once and pull out the creases to complete the base.
The Rokuro piece is fastened with washi paper.
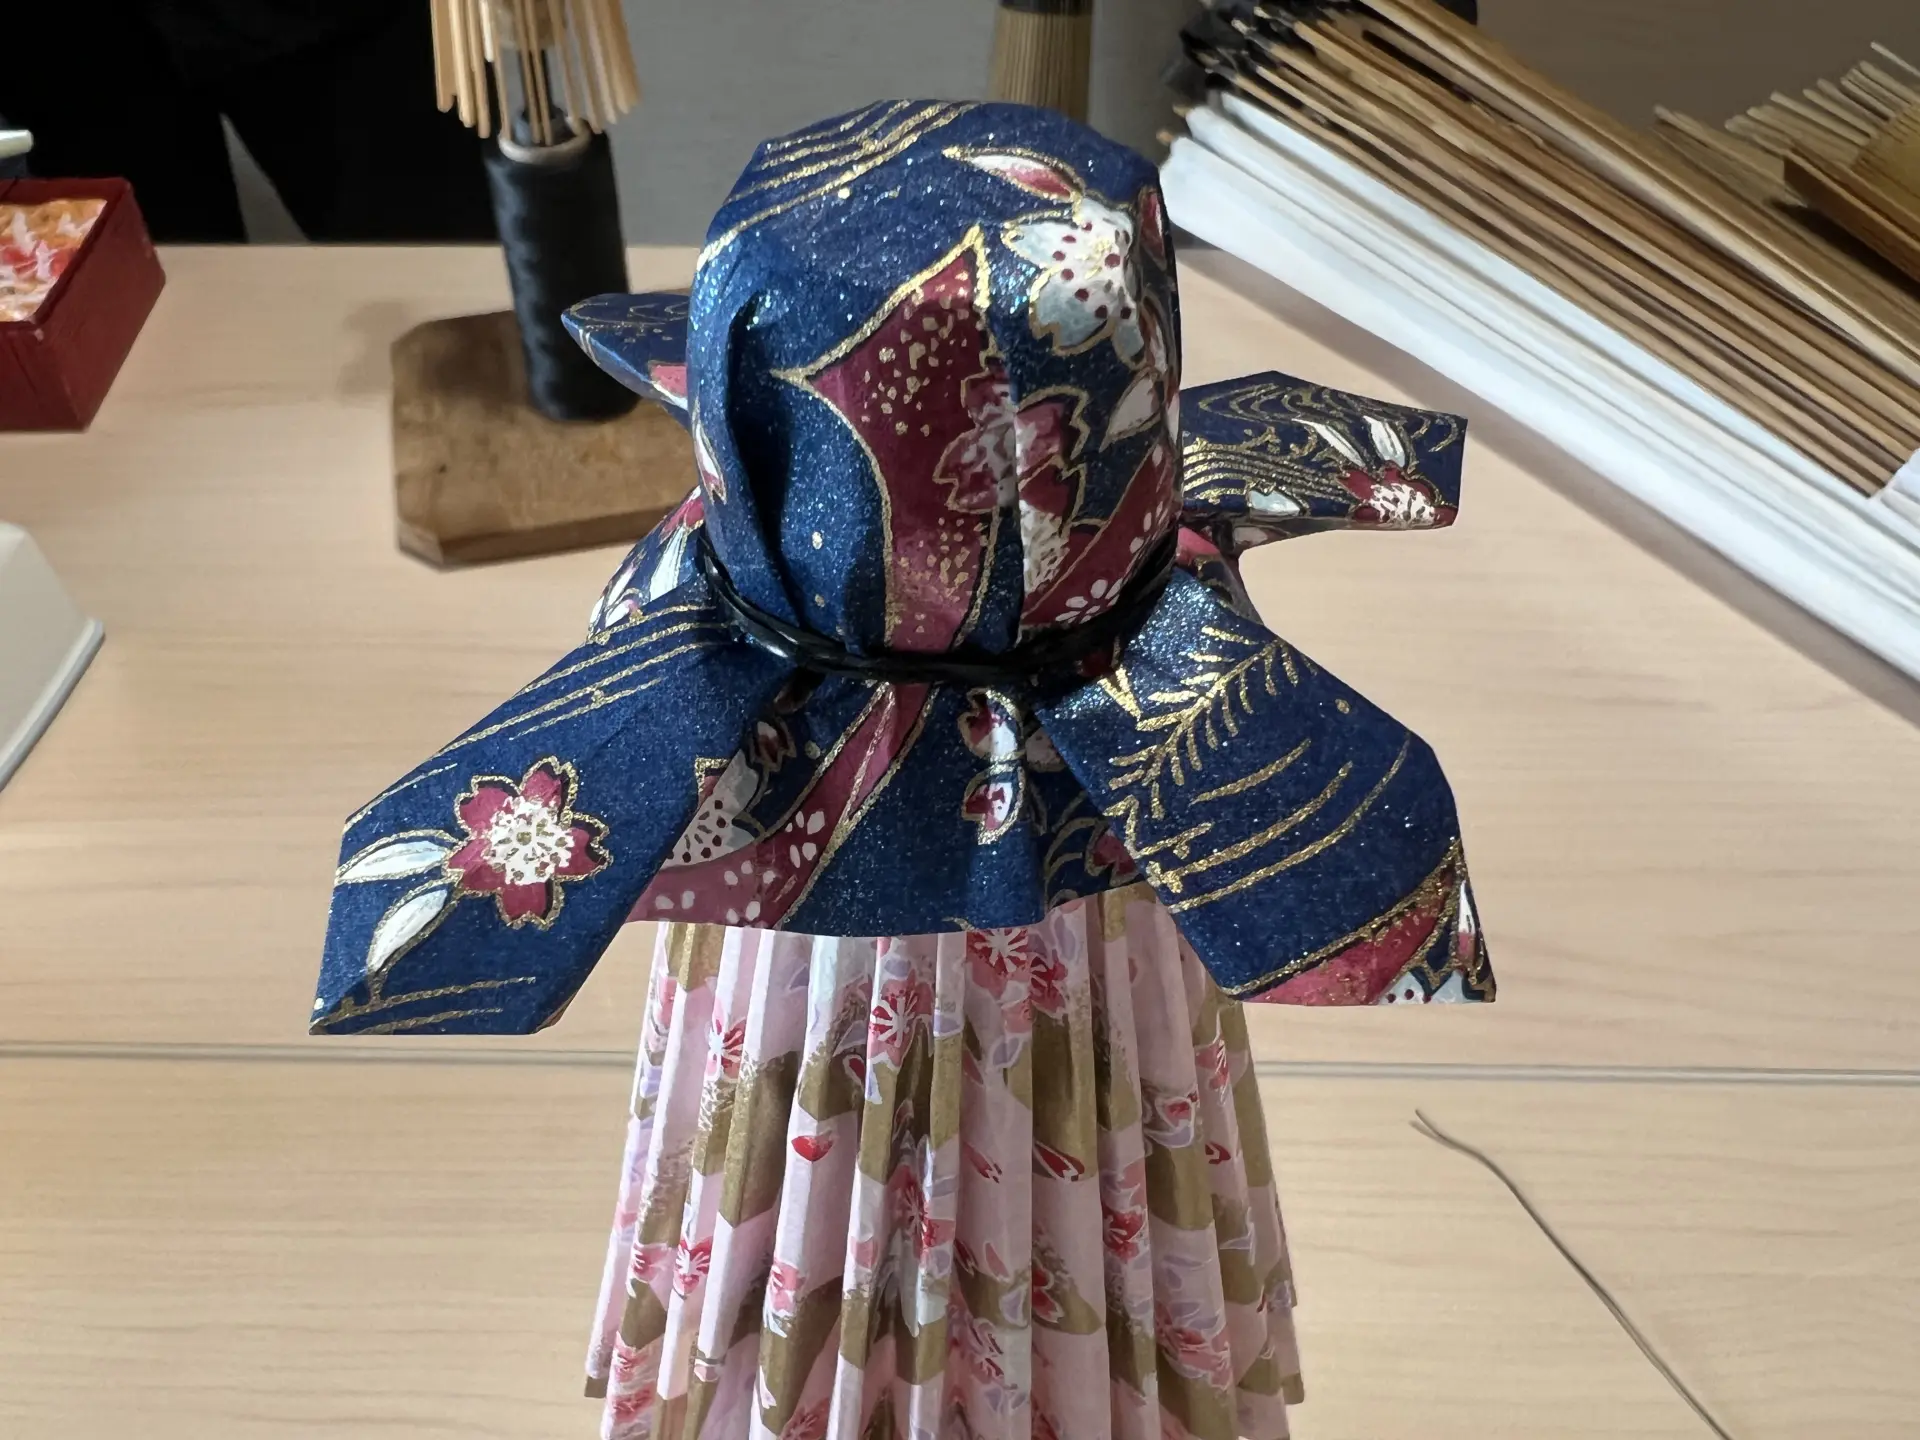
Once the frame is covered with washi the final piece is complete!
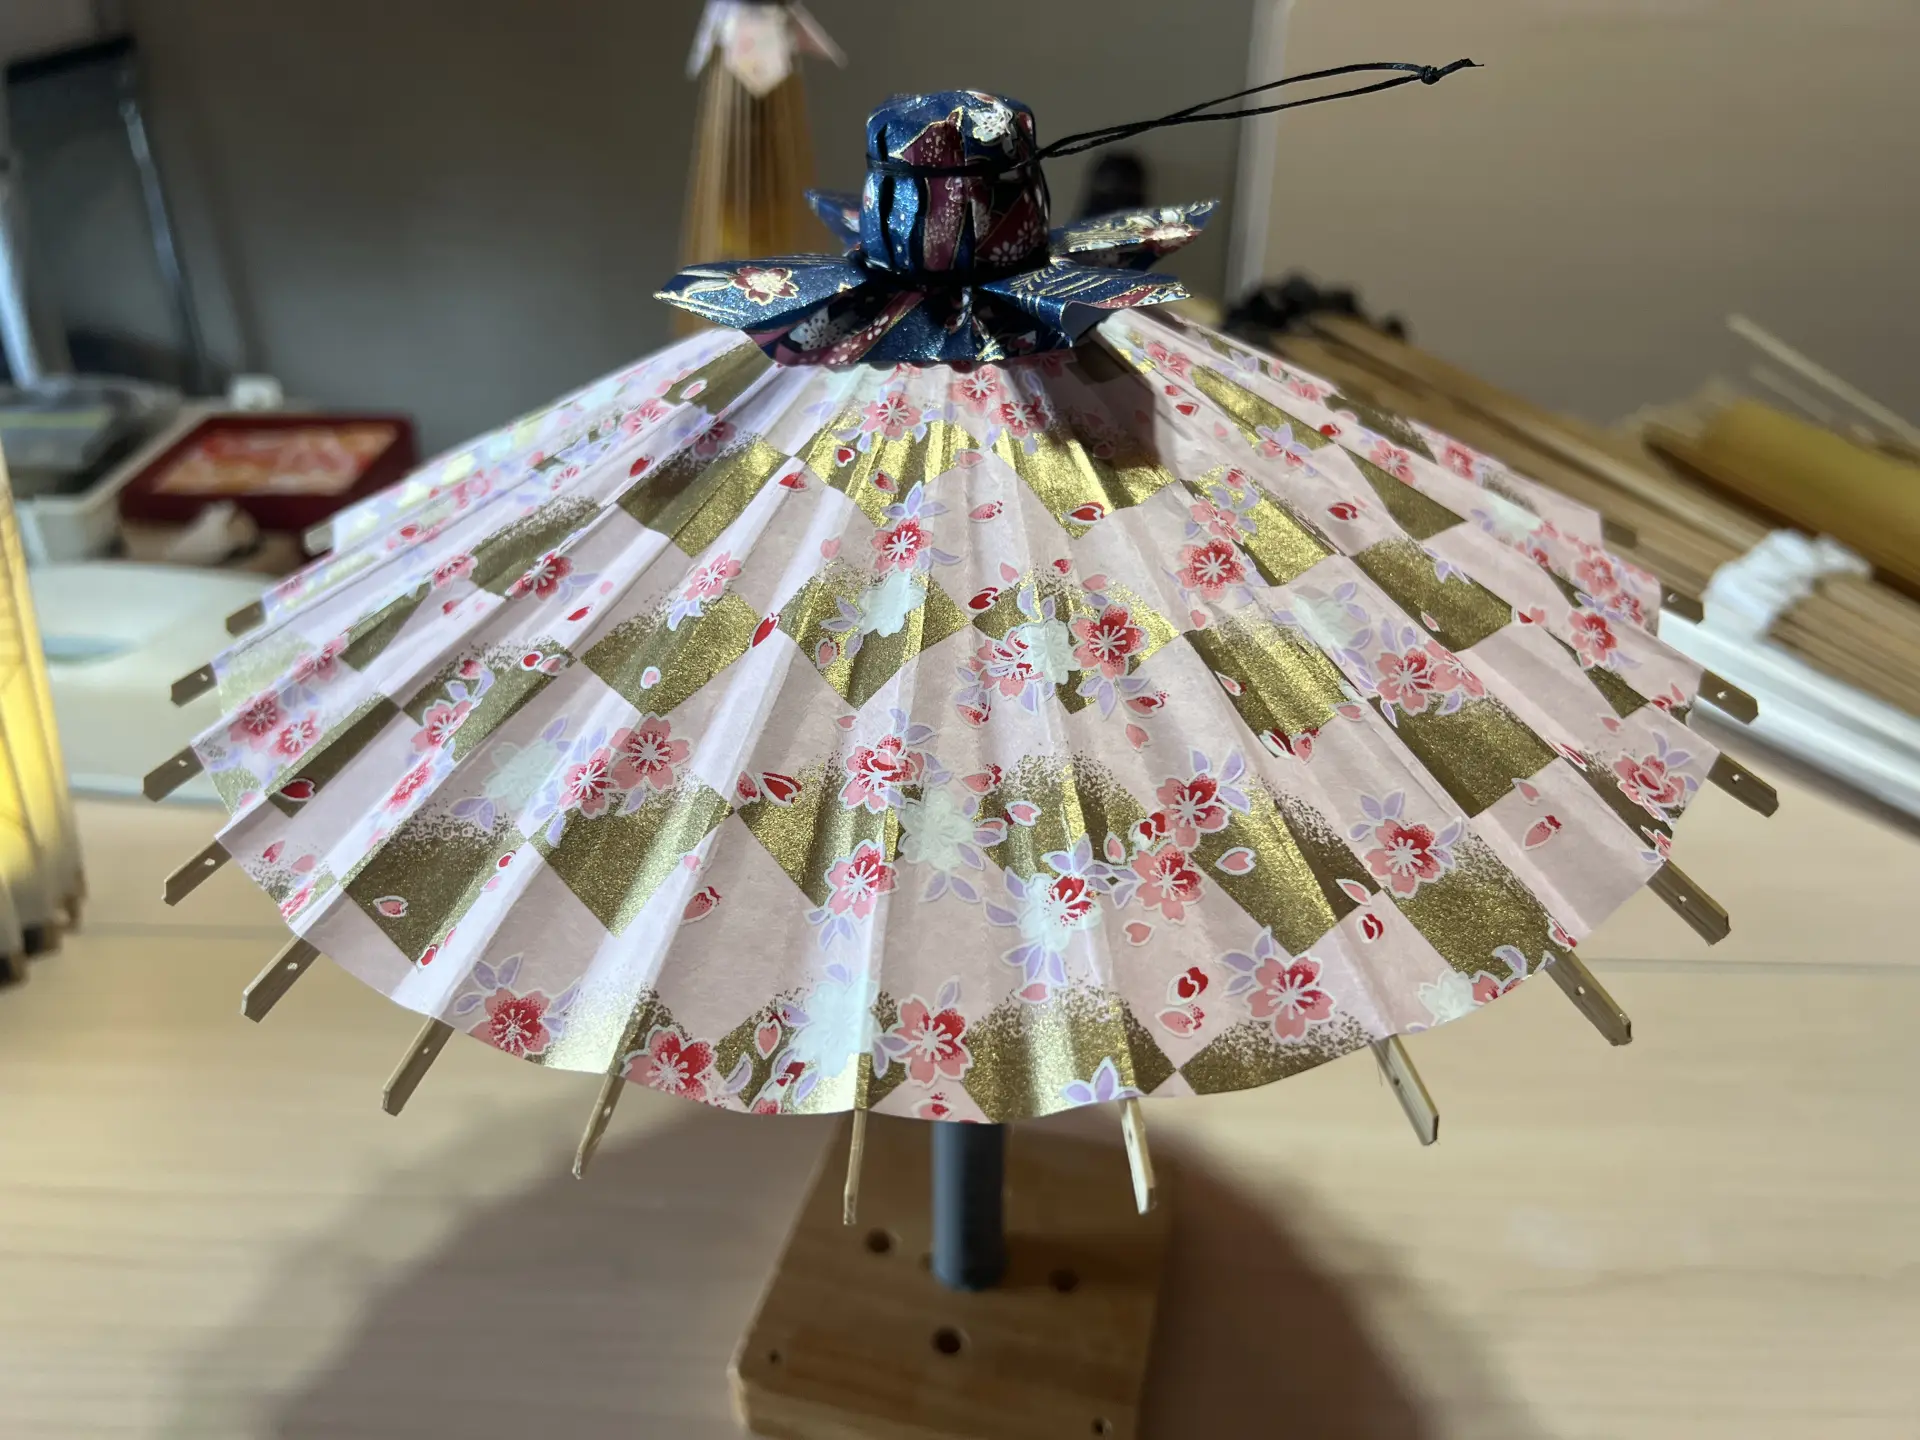
couple or friends, and I think it would be fun for everyone, from small children to the elderly, as a family. The time spent concentrating on work in a quiet space was soothing. I think the opportunity to "make an umbrella" is a once-in-a-lifetime experience, so I would like everyone to try it. The final wagasa is small and travel-friendly so you can easily pair with your favorite character, plushie or figurine and snap a photo!
The Online Shop Extra
The all original Hiyoshiya-made wagasa umbrellas are available to shop online. Here’s your chance to get your hands on the honed wonder of artisan craft.
Wrap-up
The heart and soul of intricate Japanese craft is spindled into every wagasa, a proud heritage craft. Even when closed they double as a chic accessory, while opening brings a breeze of flair and authentic beauty. Many trips to Japan include a stroll in traditional kimono or yukata. If your plans are geared that way, set off in style with a wagasa umbrella on hand. Strike a pose in front of a nearby shrine or temple for a picture-perfect moment you won’t soon forget.

Author
Freelance Announcer
Sayaka Motomura
Focused on sharing insights related to traditional culture, performing arts, and history.